
This is the first post in a series meant to help improve your static reverse engineering skills. The target audience are folks who have dipped their toes into reverse engineering but found themselves feeling lost. Ideally, readers will have acquired an interactive disassembler such as Binary Ninja, IDA Pro, or Ghidra and have a bit of experience with the C or C++ programming languages. Throughout this series, I'll include links to functions disassembled with Binary Ninja Cloud, which offers a free interactive disassembler.
This is an opinionated guide. After 12 years of reverse engineering professionally, I have developed strong beliefs on how to get good at RE.
Purpose
Reverse engineering is just one step on the road to some final goal. Which could be to reimplement someone’s algorithm, interoperate with a new system or application, looking for software vulnerabilities you can exploit, making game cheats, or reviving old dead software to run on new systems. It’s important to keep your goal in mind – sometimes we get lost in the siren song of creating and applying new structures. Only reverse engineer enough to further your ultimate goals.
Data is king
Software is meant to transfer, store, retrieve, and transform data. Software without data is an empty shell -- its only use is to demonstrate something like printing “Hello, World!” or maybe a demo.
Stop thinking about a program as a set of operations performed sequentially. If you have experience with functional programming this won’t be a hard concept to grasp -- if not, you’ll get there. We only care about the data and how it’s being transformed as it flows through the application. Stated another way, subroutines are things that happen to our data.
When starting a new reverse engineering project, we don’t care about the operations at all. We only care about data, specifically its shape (layout and structure). I’ve seen a lot of junior reverse engineers get hung up on functions like the one shown below. What does this function tell us?
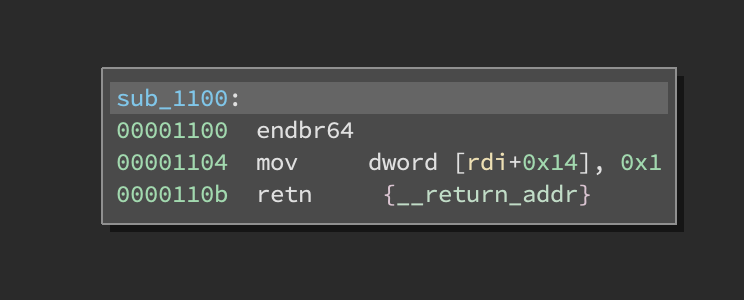
Without knowing what data this function operates on, it tells us little, but don’t just mark this function as “sets_rdi_plus_14_to_one” and move on.
This function does help us define the shape of the data a bit. There are at least four hints on the data here:
Observation #1: The first argument to the function is the pointer to a structure. rdi is the first argument on x86-64 using stdcall and cdecl calling conventions.
Justification: We dereference an offset from the register and write to it.
Observation #2: At offset +0x14, there’s a 4-byte member.
Justification: We’re writing to it as a dword (4-byte) reference.
Observation #3: That structure is at least 0x18 bytes long.
Justification: 0x14 + 0x4 = 0x18
Observation #4: The member is probably an integer or a boolean.
Justification: The initial value of 1 doesn’t make sense as an address.
Assuming this code touches data that is relevant to our goals, I’d immediately define a structure that encodes this information and apply the type to the first argument.
Approach
We often know very little about the target software when going into any reverse engineering project and it may be compiled from hundreds of thousands or millions of lines of source code. It’s impossible to fully comprehend everything but we can understand slices and over time more and more of the target software. With enough time and motivation, we can even recreate the source which, when compiled, matches the target software exactly. I once did this for Ghost In the Shellcode, copying the kenshoto and ddtek challenge library exactly and releasing my own challenges with it.
Our approach will have three phases:
- Identify the edges of the application
- Tease out the shape of the data
- Identify the purpose of the data
We’ll continue to apply this approach in repeated iterations until our goals are met.
Identify the edges of the application. We only care about code that touches data of interest – that typically means data that comes in via the network, a file, a device driver, or an RPC/IPC interface.
This is a bit of a middle-out approach. It’s generally not helpful to start at int main() for anything but the smallest executables -- for any complex application main wil be too far from the code we’re interested in. Instead, we're going to look at imports or syscalls (for statically linked executables) and start from there. Jump to your imports view and find callers of read, fread, or other data ingestion functions.
Understanding standard network and file APIs, as well as your platform’s RPC/IPC of choice, is crucial to effective reverse engineering.
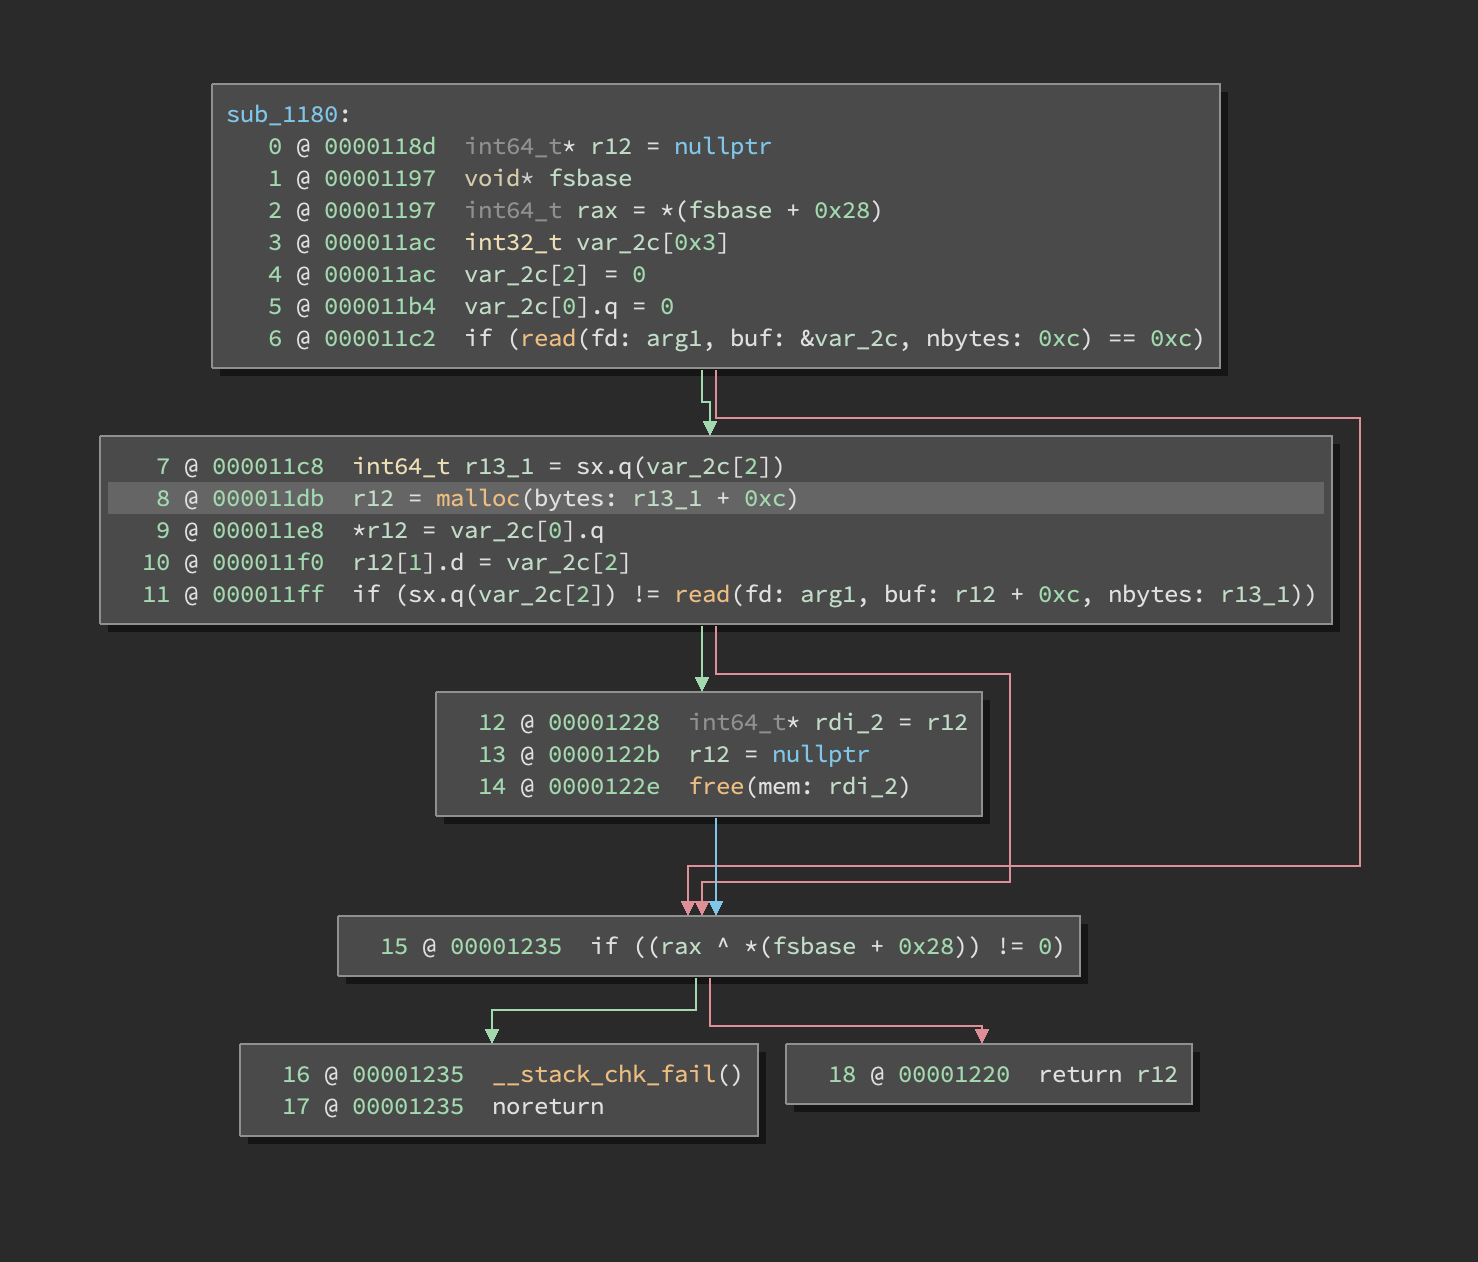
Identify the shape of the data. Once we’ve identified our data of interest, we need to figure out its shape and size. Our APIs will give us the hints we need to figure out the size. For example, the read function takes a size in the number of bytes to read. In the example provided below, read reads 0xC bytes from the network into a stack buffer (labeled var_2c):
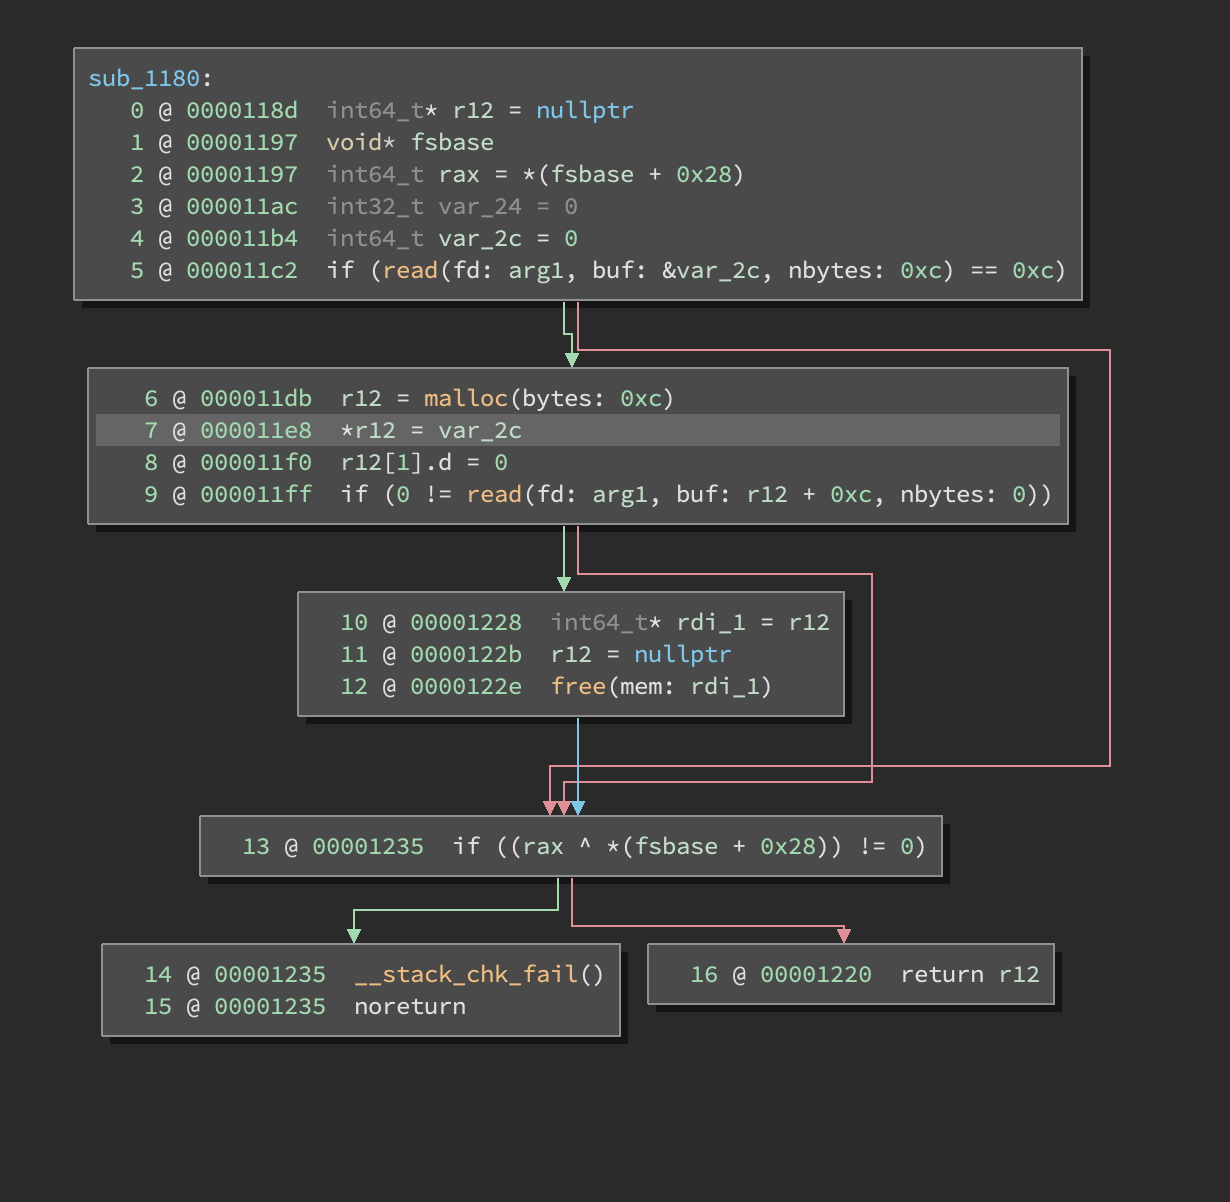
At this point, I would immediately mark var_2c as the proper size. Currently, it’s an int64_t which only has a size of 8, not 0xC. In the Binary Ninja Cloud instance, go and change var_2c to be the correct size and see what happens on the subsequent lines.
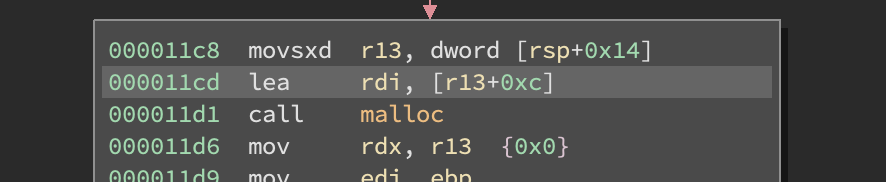
You’ll notice that the malloc argument changed. The shape is especially important because during decompilation our tools may be aggressive in the removal of code it thinks is dead or constant via processes like dead-code-elimination [DCE], dead-store-elimination [DSE], and constant folding. That’s the case in this situation, Binary Ninja’s analysis thought the addition at address 0x11cd was 0xC + 0x0 because it didn’t know the read call modified the stack variable used in the malloc calculation. You can see the addition in the original disassembly here:
Here’s the same decompilation after we update the size of the stack variable. I set it to an array of 3 integers.
Identify the purpose of the data. Only at this point do we start looking at the operations on our data. As shown in my example above in Figure 1, we were able to tease out the size of a member and get a hint about its use.
Let’s do the same thing with the example from Figure 2. After I set the appropriate size of our stack variable (let’s rename it to buf), a few additional uses popped up.

I see three main uses:
- Lines 4-5: This is initializing our buffer to zero, likely a
memsetor inline zeroing. - Line 7: This takes a four-byte value, expands it to 8 bytes, and uses it in the malloc size calculation and read size.
- Lines 9-10: This looks like an inlined
memcpyinto themalloc’d buffer.
The structure probably looks like this:
struct S {
   int magic;
   int magic2;
   int size;
   char buf[]; // size’d buf
};
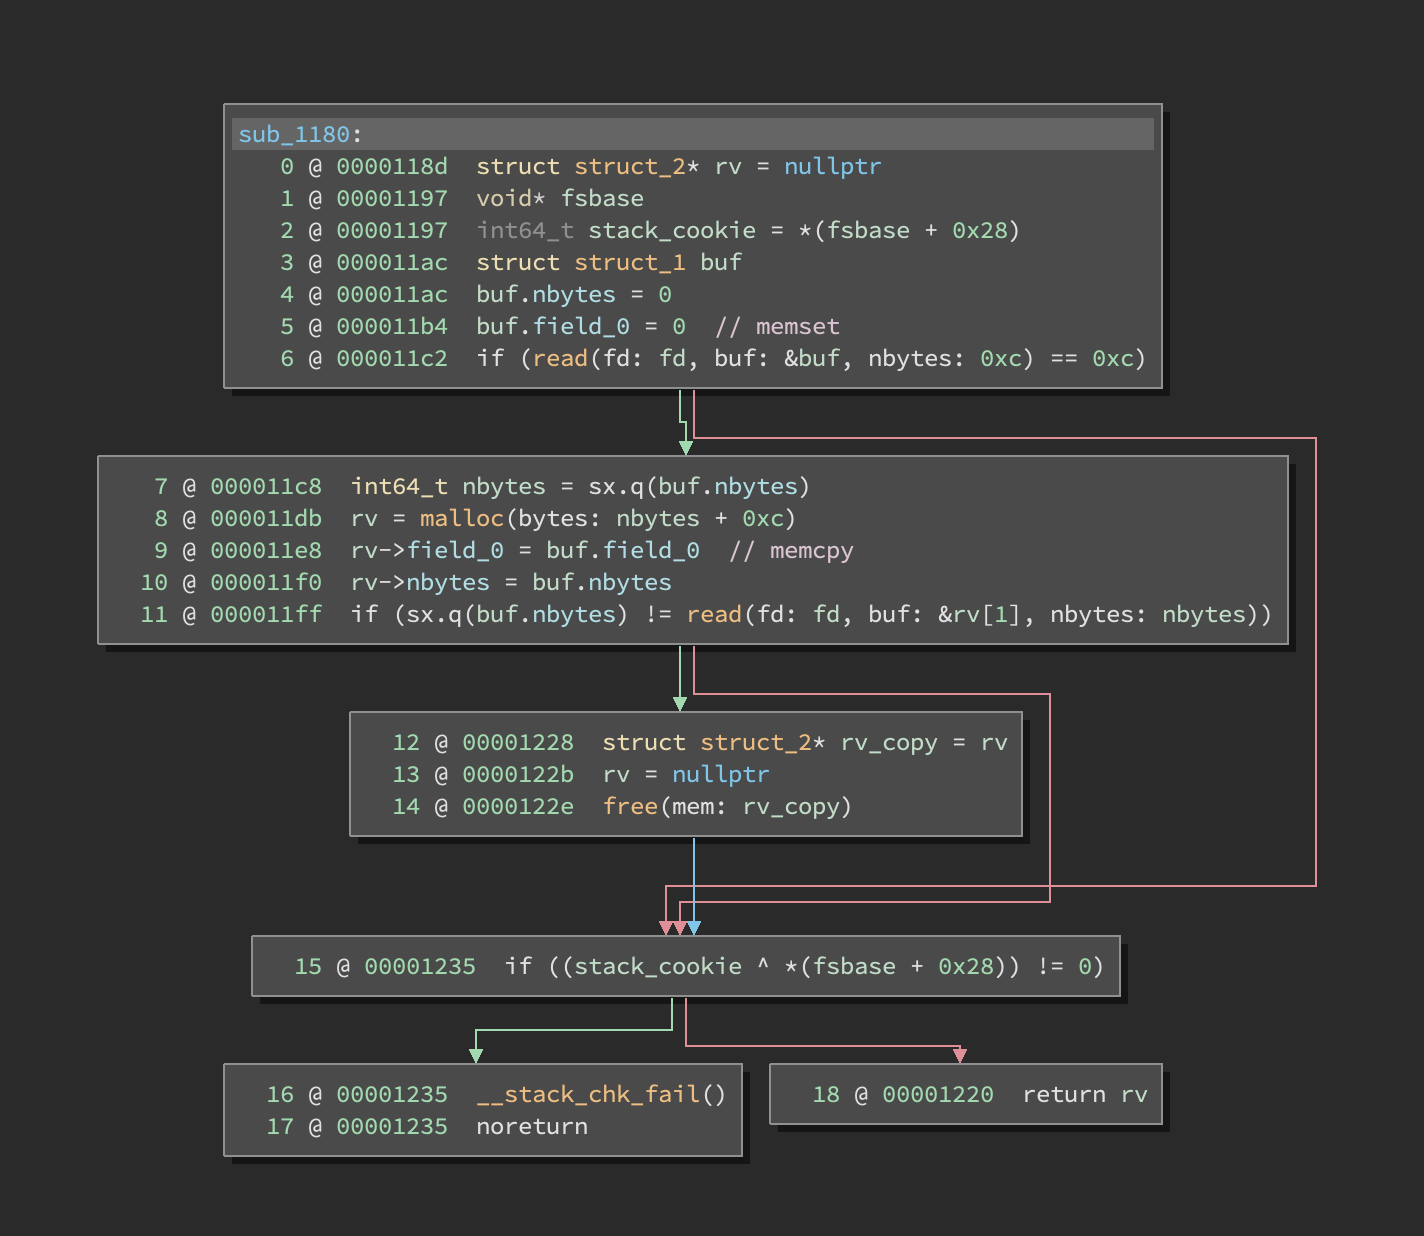
This function reads in a short structure header, allocates an appropriate buffer with a size parameter in the structure, and copies additional data at the end of the buffer.
Up next
In the next blog post, we’ll go over how to best identify the shape of data when we can’t lean on standard file and network APIs. Fair warning: we’re going to be writing some code.
For a bonus point, find the potentially exploitable vulnerability in the examples above.