
This is the second part in our three-part series on exploring WebRTC, Signal-iOS, and iOS exploitation. The first post in this series surveyed WebRTC's implementation of various protocols, injected arbitrary read and arbitrary write vulnerabilities, and set up a research environment to trigger the vulnerabilities. This post continues our research and covers the following topics:
- Breaking ASLR with sequential leaks
- Limitations of Xcode’s iOS simulator
- Setting up Corellium for iOS emulation and exploit development
- Locating and exfiltrating Signal's database
- Stack pivoting and ARM64 ROP chains
We’ll start where we left off with triggering the vulnerabilities and end with full RCE!
Part 2 - Leveraging Vulnerabilities for iOS Exploitation
We concluded the first blog post by triggering an arbitrary write at unmapped memory and crashing the app. This achieves a denial of service but does not demonstrate the true power of our arbitrary read and write primitives. Instead, we want to harness these vulnerabilities to invoke remote code execution (RCE) and do something meaningful. Let's set our goal as leaking data from Signal's database back to our attacking device.
The first step in this process is hijacking execution. There are a variety of strategies for this, such as spoofing C++/Objective-C classes or vtables to trigger unexpected behavior. But for this example, let’s use a tried and true method: hijacking a pushed instruction pointer on the stack to trigger a Return-Oriented Programming (ROP) chain.
The hurdle with this approach is that we need a reliable stack address, and right now all we have is a leaked RTCPReceiver heap address. We must find a bridge from this WebRTC object instance to the process's stack.
Breaking ASLR
Let’s briefly discuss the iOS shared cache before going any further, as it is imperative to iOS exploitation and our goal of linking heap and stack addresses. Like most modern operating systems, iOS relies on a set of core functionalities to run its apps. Much of this functionality is defined in libraries packaged into the shared cache. This cache is loaded as a block of memory to improve performance, meaning there is a single “slide” (randomization) applied to all contained libraries. This is ideal from an attacker’s perspective, as breaking Address Space Layout Randomization (ASLR) for a single shared cache library thereby bypasses randomization for all contained libraries.
Also, because of its size and broad functionality, the shared cache contains basically any ROP gadget an exploit developer could need. We rely heavily on it for our ROP chain.
The shared cache changes for every version of iOS, meaning a real-world exploit would fingerprint the system and dynamically adapt to the target version. Fingerprinting is not included in our example exploit as we only seek to demonstrate RCE against a single, known target. Our target is an iPhone 14 Pro running iOS 16.4 (20E247)
We can fetch the target firmware and extract the shared cache using Blacktop’s ipsw tool. Download and extract using the following commands:
ipsw download --device iPhone15,2 --build 20E247 ipsw
ipsw extract --dyld iPhone15,2_16.4_20E247_Restore.ipsw # extracts the shared cache
Adam Wolf maintains a useful list of device names to device ID translations in this gist.
ipsw also extracts individual libraries from the shared cache, which is useful as we dig into library internals and search for ROP gadgets. We can extract the libdyld.dylib library, used in the next section, using the following command:
cd 20E247__iPhone15,2 && ipsw dyld macho -x dyld_shared_cache_arm64e libdyld.dylib
Leaking the Stack(s)
Our current goal is finding a stack address that we can overwrite with a ROP payload to hijack execution using only the leaked RTCPReceiver heap address. Stack addresses are rarely stored in heap objects but may be referenced in shared libraries. For instance, the core glibc library on Linux stores the address of the process environment variable strings, located on the stack, in its __environ symbol. iOS has similar process environment symbols in its shared cache, specifically the _NXArgv, ___progname, _environ, and _NXArgc variables in the libdyld.dylib library. Testing showed _NXArgv reliably pointed to the main thread’s stack!
Now we need a bridge from the C++ object’s heap address to the shared cache. C++ classes maintain references to their methods in virtual method tables (vtables), which are essentially arrays of function pointers. Class instances generally reference their vtable in their allocation’s first eight bytes. Leaking this address leaks the WebRTC library's __const segment for WebRTC-defined classes. With a WebRTC __const address we can calculate WebRTC 's base address.
For the remainder of this post, WebRTC stylized as code refers to the compiled library loaded into process memory rather than the overarching code base.So now we need to bridge from WebRTC to the shared cache. Scrolling through WebRTC imports, we see that WebRTC relies upon Objective-C functionality from the Foundation library. This can be confirmed statically in IDA by investigating the __objc_classrefs section:
WebRTC 's __objc_classrefs section, showing Objective-C class imports.Reading the value at these symbols leaks a Foundation address in the shared cache and reveals the shared cache’s slide. This breaks ASLR for the entire shared cache, including the address for _NXArgv! Therefore, our strategy for leaking the program stack is as follows:
- Leak
*RTCPReceiver, which is aClock* clock_object - Leak
*clock_, which is the childRealTimeClockclass’s vtable pointer to aWebRTC__constaddress - Calculate
WebRTC's base address using the leaked vtable address - Calculate the address of
__objc_classrefsinWebRTC - Leak the
_OBJC_CLASS_$_NSStringvalue, which points to theFoundationlibrary - Calculate the shared cache slide using
Foundation’s offset in the target iOS version's shared cache - Calculate the address of
_NXArgvinlibdyld.dylibusing the shared cache slide - Leak the main thread’s stack address stored in
_NXArgv
Note: see the Limitations of the Simulator section to understand why this does not work on the iOS simulator.
Not bad! But you may notice that this stack address is not the address where we want to hijack execution—in fact, we have not yet determined what that address is. We need to investigate the program's state when triggering our vulnerabilities to define this target address.
Our memcpy occurs in RTCPReceiver::ParseCompoundPacket. To begin our ROP chain, we must clobber this function’s stack frame or one of the calling function’s frames. How do we know the offset between the leaked _NXArgv stack address and the target frames? Is that offset even constant?
We need to make and confirm some assumptions to answer this question. First, it is important to note _NXArgv always leaks the main thread's stack but our packet is handled on a completely different thread! WebRTC has three primary threads which are spawned by the RTCPeerConnectionFactory for individual and group calls:
// webrtc/sdk/objc/api/peerconnection/RTCPeerConnectionFactory.mm
- (instancetype)initNative {
  if (self = [super init]) {
    _networkThread = rtc::Thread::CreateWithSocketServer();
    _networkThread->SetName("network_thread", _networkThread.get());
    BOOL result = _networkThread->Start();
    RTC_DCHECK(result) << "Failed to start network thread.";

    _workerThread = rtc::Thread::Create();
    _workerThread->SetName("worker_thread", _workerThread.get());
    result = _workerThread->Start();
    RTC_DCHECK(result) << "Failed to start worker thread.";

    _signalingThread = rtc::Thread::Create();
    _signalingThread->SetName("signaling_thread", _signalingThread.get());
    result = _signalingThread->Start();
    RTC_DCHECK(result) << "Failed to start signaling thread.";
  }
  return self;
}
Setting a breakpoint on ParseCompoundPacket and sending our trigger.py payload shows that packet handling is done on the worker thread.
webrtc::RTCPReceiver::ParseCompoundPacket showing handling on the worker thread.Is the worker thread's stack some fixed distance from the main thread's stack? Let’s test by hooking execution with an LLDB script in Xcode that computes and compares the top of each stack:
import lldb

# load in lldb with `command script import <path to stack_comparison.py>
# run in lldb with `compare_stacks` after the app spawns

def __lldb_init_module(debugger, internal_dict):
  debugger.HandleCommand("command script add -f stack_comparison.compare_stacks compare_stacks")

def compare_stacks(debugger, command, result, internal_dict):
    target = debugger.GetSelectedTarget()
    if not target:
        result.PutCString("No target Selected.\n")
        return
    process = target.GetProcess()
    if not process:
        result.PutCString("No process running.\n")
        return
    dump_frame_pointers(process)

def dump_frame_pointers(process):
    threads = process.get_process_thread_list()

    # dict of {"TID": ["thread name", top_of_stack_addr]}
    thread_stacks = dict()
    for t in threads:
        f = t.GetNumFrames()
        tid = str(t.GetIndexID())
        name = t.GetName()
        if name is None and tid == "1":
            name = "main"
        for i in range(f):
            fp = t.GetFrameAtIndex(i).GetFP()
            if not tid in thread_stacks:
                thread_stacks[tid] = (name, fp)
            elif thread_stacks[tid][1] < fp:
                thread_stacks[tid] = (name, fp)
    thread_stacks = {k: v for k, v in sorted(thread_stacks.items(), key=lambda item: item[1][1])}
    for (k, v) in thread_stacks.items():
        if v[0] is None:
            continue
        print("{:08x}: {} - {}".format(v[1] - thread_stacks["1"][1], v[0], thread_stacks["1"][0]))
And what we find is really interesting. Spawned threads stacks exist at a higher addresses than the main stack, and the offsets remain constant.
00000000: main - main
0022ba00: com.apple.uikit.eventfetch-thread - main
0045ba00: AXSpeech - main
00667a00: tokio-runtime-worker - main
00873a00: tokio-runtime-worker - main
00a7fa00: tokio-runtime-worker - main
00c8ba00: tokio-runtime-worker - main
00e97a00: tokio-runtime-worker - main
010a3a00: tokio-runtime-worker - main
0112fa00: network_thread 0x0x2805d05a0 - main
011bba00: worker_thread 0x0x2805d0780 - main
01247a00: signaling_thread 0x0x2805d0870 - main
01453a00: call-manager-worker - main
01c3fa00: com.apple.CFSocket.private - main
01ccba00: com.apple.NSURLConnectionLoader - main
...
The offsets may be different than above between iOS and Signal-iOS versions, but the offset values should remain consistent across runs.
Running a handful of times shows that the worker_thread stack is 0x11bba00 bytes higher than the main thread stack. This is great news, as the _NXArgv leak also breaks randomization for the WebRTC thread stacks! We decide to hijack control at the return from RTCPReceiver::IncomingPacket, the function which calls the vulnerable ParseCompoundPacket function. We can set a breakpoint on that function and easily calculate the exact offset from its pushed lr pointer to the leaked _NXArgv address.
It is worth noting that we observed occasional exceptions to this conclusion. Every so often, the WebRTC threads shift 0x8c000 bytes (together) up or down. Presumably, this is due to a race condition in thread spawning, though we did not extensively analyze the root cause. As shown above, theworker_threadis always sandwiched 0x8c000 bytes above thenetwork_threadand 0x8c000 bytes below thesignaling_thread. To compensate for the occasional incorrect offset, we simply adapted our script to perform an arbitrary read at the target overwrite address and compare the retrieved value against the expectedlrvalue. If it matches, the script continues. If it does not then the exploit shifts the target read 0x8c000 bytes up or down and performs the comparison again. In the event neither shift matches, the exploit terminates rather than sending an incorrect address, which would crash the process.
Identifying a Goal
At this point, we have a strategy to leak a handful of addresses so that we can copy an arbitrary payload onto the stack, thereby hijacking execution when a pushed lr is loaded. So the next question is: what do we want to do with this power?
We thought it would be fun to exfiltrate some data. A perfect target for this is the on-device Signal database.
Signal-iOS Pods dependencies include the GRDB toolkit which manages the Signal-iOS SQLite database. The DatabasePool class is responsible for this, though Signal-iOS wraps this in multiple layers of abstraction. One of these layers is the GRDBDatabaseStorageAdapter class in the SignalServiceKit (SSK) library. GRDBDatabaseStorageAdapter contains an NSURL databaseFileUrl which stores the file path to the database. We can use this information to identify the Signal database path with a simple LLDB script. Load the app, click around a bit, load the script, and click around some more to trigger a database access. The script output should show a path of the form:
file:///Users/<user>/Library/Developer/CoreSimulator/Devices/0B0A733F-9AB5-4062-8E88-032F2CC0534F/data/Containers/Shared/AppGroup/C87E0E7A-BB36-4E21-9E11-CC9886269EF3/grdb/signal.sqliteif the target is running in the Xcode Simulator, or:
file:///private/var/mobile/Containers/Shared/AppGroup/CF920F33-AB4B-41F3-A88E-1146DF8857EE/grdb/signal.sqlite
if targeting a jailbroken device.
That’s great! However that app group UUID is concerning. To make this exploit reliable we need a way to resolve the it, and we do not have access to the GRDBDatabaseStorageAdapter instance to look up this path remotely like we did in the LLDB script.
More Leaks: Leaking the Database Path
At this point it is worth taking a step back and thinking philosophically about how Signal uses the database. Surely it is already open in memory, because opening and closing the database for every transaction is unrealistic. Furthermore, it is likely there is some global state variable with a handle to the open database for easy access. After some digging, it turns out the SignalServiceKit has a gigantic SSKEnvironment class with handles to important state classes and queues. Included is a databaseStorageRef: SDSDatabaseStorage reference to yet another database abstraction. SDSDatabaseStorage has a member variable, grdbStorage: GRDBDatabaseStorageAdapter which contains a URL holding the database path on disk.
We can use this traversal plus the philosophy included in the LLDB script linked above to leak the database path:
SSKEnvironment instance->grdbStorage->databaseFileUrl->url NSString->filepath char*
Our target is now the SSKEnvironment instance to begin this chain. This class defines a _shared property for shared access, and there is a SSKEnvironment.shared.getter function in the SignalServiceKit library. Let's open this in IDA to see where this shared object resides in memory.
__int64 static SSKEnvironment.shared.getter()
{
  int *v0; // x19
  int *v1; // x0
  __int64 result; // x0

  if ( one-time initialization token for _shared != -1 )
    result = swift_once(&one-time initialization token for _shared, one-time initialization function for _shared);
  v0 = static SSKEnvironment._shared[0];
  if ( static SSKEnvironment._shared[0] )
  {
    v1 = objc_retain(static SSKEnvironment._shared[0]);
    return (__int64)v0;
  }
  else
  {
    __break(1u);
  }
  return result;
}
Following the SSKEnvironment._shared[0] cross-reference shows a global SSKEnvironment instance stored in the library's __data segment!
__data:000000000104AEF0 ; static SignalServiceKit.SSKEnvironment.(_shared in _EEC8B08E64177A87B63E94E9361FDCEA) : SignalServiceKit.SSKEnvironment?
__data:000000000104AEF0 _$s16SignalServiceKit14SSKEnvironmentC7_shared33_EEC8B08E64177A87B63E94E9361FDCEALLACSgvpZ DCQ dword_0
Unfortunately we have not yet broken ASLR for the SignalServiceKit library.
Again, taking a step back, we can theorize that the main Signal binary has some imports to SSK functions or variables. Sure enough, there are references to SSKEnvironment.shared.getter and a variety of other SSK functions in Signal’s Global Offset Table (GOT). GOT symbols are unfortunately not exported, so tools like nm and ipsw do not resolve their addresses easily. Instead, we can parse the disassembly for calls to the target function and manually follow a call to the GOT stub function that fetches the GOT address:
- Find the address of a function that calls some
SSKEnvironmentfunctions, likestatic (extension in Signal):SignalServiceKit.OWSSyncManager.shared.getter : SignalServiceKit.OWSSyncManager - Find a call to a stub function in the
__stubssegment, such astype metadata accessor for SignalServiceKit.SSKEnvironment - Find the GOT address loaded into x16 in the stub
- Read that address using the leak primitive to leak a
SignalServiceKitaddress
Breaking randomization for the SignalServiceKit library allows us to find the SSKEnvironment global variable's address and the instance it stores. We are then free to leak database object and URL to fingerprint the SQLite database path on the device!
The Final Leaks
We have leaked a lot of valuable information, but we are unfortunately not done quite yet. The database leak depends upon having a Signal binary address, but as of yet we only have WebRTC and the shared cache. How do we bridge what we have to Signal?
The shared cache contains core libraries responsible for bootstrapping apps, so it stands to reason there is a reference to the Signal binary somewhere. Let’s start by investigating how an app is initialized at runtime. iOS apps have a main.swift or main.m file defining their entry point. This file includes a call to UIApplicationMain which creates the app's overarching UIApplication instance. The following is Signal’s main.m file:
int main(int argc, char *argv[])
{
    NSString *appDelegateName;

    @autoreleasepool {
        // Any setup work pre-UIApplicationMain() should be placed
        // inside this autoreleasepool.
        appDelegateName = NSStringFromClass(AppDelegate.class);
    }

    // UIApplicationMain is intentionally called outside of the above
    // autoreleasepool. The function never returns, so its parent
    // autoreleasepool will never be drained.
    return UIApplicationMain(argc, argv, nil, appDelegateName);
}
The third argument is a principalClassName for specifying a custom UIApplication class. Signal chooses nil for this argument, meaning it will default to the generic UIApplication class. This instance is shared and accessible via the global _UIApp variable in the UIKitCore shared cache library. This is all rather boiler-plate.
Next, the UIApplication must instantiate a delegate: UIApplicationDelegate, which in this case is Signal-specific. Somewhat similar to C++ objects, Swift (Objective-C) objects maintain inheritance through an ISA property. Because the delegate is defined in Signal’s code, its ISA points to its meta-class in the Signal binary!
Putting it all together, we can obtain a Signal address, then a SignalServiceKit address, then the database file path through a series of leaks once we have the shared cache slide:
- With the shared cache slide, calculate the
_UIAppglobal address inUIKitCore - Leak the
UIApplicationinstance - Leak the
UIApplicationDelegateinstance from theUIApplication'sdelegatemember variable - Leak the first eight bytes at the
delegate, which is theISApointer to the meta class - Apply the
ISAaddress mask (0x0000000ffffffff8) to the pointer to get the instance address - Leak the delegate's meta-class in the
Signalbinary and computeSignal's base address - Leak an imported
SignalServiceKitfunction address fromSignal’s GOT and compute the globalSSKEnvironmentaddress - Leak the
SSKEnvironmentinstance - Leak the
databaseStoragemember variable - Leak the
databaseFileUrlmember variable - Leak the
NSURL’sNSMutableStringparameter - Leak the character string for the file (chopping off the URL-prepended
file://to leave just the file path)
Let’s take a moment to appreciate this—we use a single WebRTC object address (on one of the iOS heaps) to break ASLR for the WebRTC shared library, all shared cache libraries, the SignalServiceKit shared library, the Signal binary, and the process stack. In turn, we also leak the address of Signal’s SQLite database on disk and a target lr on the worker thread's stack. That’s pretty cool! But we cannot rest just yet - we now need a strategy to exfiltrate the database’s data.
RtcpReceiver object to the target addresses.It is worth noting here as to why we jump through extra hoops to leak the database file path when we know it is open in memory. We decided against using the opened database to avoid any issues with synchronous access from other threads and potential side effects of moving the existing file handle. It is also worth noting that the ROP chain could use fcntl to find the database path from an open descriptor; testing showed it is frequently open in fd 7, but occasionally ends up in fd 8. Looping in ROP chains is not fun (we will see that later on) and makes the payload quite lengthy, so the extra couple of leaks here are worth it.Leveraging the Encrypted Transport
Our eight-byte arbitrary read won’t cut it when it comes to leaking database data back to our attacking phone. Luckily, we have a fully-encrypted communication channel already established and at our disposal! We currently have a leaked RTCPReciever instance, but that class is only responsible for handling received packets. However, its member ModuleRtpRtcp* const rtp_rtcp_ is a reference to the overarching RTP/RTCP interface and is a ModuleRtpRtcpImpl2 instance. This class maintains an RTCPSender object, which is exactly what we want! Specifically, we want a handle to the overarching MediaChannelUtil transport used to send packets. Our target is a call to MediaChannelUtil::TransportForMediaChannels::SendRtcp, which takes a simple vector-like rtc::ArrayView of data and queues an outgoing packet after passing it to the SRTP Transport layer for encryption. This is perfect for our use case—if we open and read the database into a new mmapped region, we can iterate through the buffer and queue a series of outgoing packets on the same connection. We can also pretty trivially leak the required instances:
RTCPReciver instance->rtp_rtcp_->rtcp_sender_->transport_
And we already have the base WebRTC library address so finding MediaChannelUtil::TransportForMediaChannels::SendRtcp is as easy as adding its offset (we can also leak it through the TransportForMediaChannels instance’s vtable if needed).
This strategy sets us up for RCE and database exfiltration. But we have a problem with our current research environment, and it’s worth tackling that now before going any further.
Limitations of the Simulator
The iOS simulator proved useful for our initial exploit testing when targeting the WebRTC binary using a WebRTC leak. Our next step in the leak chain is to leak a Foundation address using WebRTC’s imports, which does works. But after that, we fail to pivot to libdyld.dylib and _NXArgv in the shared cache. The root of the issue is the iOS Simulator and its inherent research limitations.
It comes down to the difference between a simulator and an emulator. A simulator does what it sounds like—simulates behavior but does not necessarily replicate it. This is fine for iOS development—as long as the app under development can interact with the shared cache APIs, it does not require perfect device replication. Conversely, an emulator strives for replication of an environment down to some level of granularity; it will never be the “exact” environment it emulates, but it wants to be as close as possible.
One shortcut the iOS Simulator takes is it does not implement the shared cache for the iOS version under simulation. Rather, it downloads individual binaries that are relevant for app development and stores them individually on the host filesystem. Presumably, this is because the shared cache contains a ton of added functionality that is critical for certain on-device processes but irrelevant for third-party app development.
We can confirm this by tracing the path of a loaded image using image list <image name> in the Xcode debugger. For iOS 17.2 (21C62), the path to Foundation is /Library/Developer/CoreSimulator/Volumes/iOS_21C62/Library/Developer/CoreSimulator/Profiles/Runtimes/iOS\ 17.2.simruntime/Contents/Resources/RuntimeRoot/System/Library/Frameworks/Foundation.framework/Foundation, meanwhile the path for libdyld.dylib is /Library/Developer/CoreSimulator/Volumes/iOS_21C62/Library/Developer/CoreSimulator/Profiles/Runtimes/iOS 17.2.simruntime/Contents/Resources/RuntimeRoot/usr/lib/system/libdyld.dylib. This clearly shows that the simulator breaks up the core shared cache libraries into separate images on the host’s disk.
But the problem is not necessarily that the simulator splits the shared cache into multiple binaries—at the end of the day, the shared cache ipsw file is a bundle of individual images anyway. The issue is that on a real device these images are slid together so that leaking a single address in a single image breaks ASLR for all images. If the simulator mimicked this behavior, we would expect to see the relative offset between simulator-loaded cached libraries match the iOS version’s ipsw file.
The ipsw tool helps us find these expected offsets. For example, the offset between Foundation and libdyld.dylib for iOS version 17.2 running on the iPhone 15 Pro (our simulator device) can be found with these commands:
$ ipsw download --device iPhone15,4 --build 21C62 ipsw
$ ipsw extract --dyld iPhone15,4_17.2_21C62_Restore.ipsw
$ cd 21C62__iPhone15,4
$ ipsw dyld macho -l dyld_shared_cache_arm64e Foundation | head -n 6
Magic         = 64-bit MachO
Type          = DYLIB
CPU           = AARCH64, ARM64e caps: USR00
Commands      = 41 (Size: 7960)
Flags         = NoUndefs, DyldLink, TwoLevel, WeakDefines, BindsToWeak, AppExtensionSafe, DylibInCache
000: LC_SEGMENT_64 sz=0x00b60000 off=0x00074000-0x00bd4000 addr=0x186d34000-0x187894000 r-x/r-x   __TEXT
$ ipsw dyld macho -l dyld_shared_cache_arm64e libdyld.dylib | head -n 6
Magic         = 64-bit MachO
Type          = DYLIB
CPU           = AARCH64, ARM64e caps: USR00
Commands      = 27 (Size: 2896)
Flags         = NoUndefs, DyldLink, TwoLevel, NoReexportedDylibs, AppExtensionSafe, DylibInCache
000: LC_SEGMENT_64 sz=0x00027ff8 off=0x060e8000-0x0610fff8 addr=0x1adbc4000-0x1adbebff8 r-x/r-x   __TEXT
The start of the addr field in each macho command are used to to calculate the offset between the two libraries: 0x1adbc4000-0x186d34000=0x26e90000. Comparing with the simulator, Xcode shows the following mappings:
(lldb) image list Foundation
[  0] 03B66A9F-BE07-39EF-812D-EA7D8B87F7EB 0x0000000180797000 /Library/Developer/CoreSimulator/Volumes/iOS_21C62/Library/Developer/CoreSimulator/Profiles/Runtimes/iOS 17.2.simruntime/Contents/Resources/RuntimeRoot/System/Library/Frameworks/Foundation.framework/Foundation
(lldb) image list libdyld.dylib
[  0] A8A57482-5D24-3787-8776-DE959BFA77D7 0x0000000180295000 /Library/Developer/CoreSimulator/Volumes/iOS_21C62/Library/Developer/CoreSimulator/Profiles/Runtimes/iOS 17.2.simruntime/Contents/Resources/RuntimeRoot/usr/lib/system/libdyld.dylib
This resolves to an offset of 0xffffffffffafe000, which is clearly not right. This shows the individual binaries are slid independently with no regard for the relative offsets expected on a real device.
This is a problem for our research, because it fundamentally breaks a runtime assumption needed to chain our leaks together. To solve this, we need an emulator or jailbroken device.
Leveraging the Corellium Emulator
The following sections continue research by mimicking real-world devices using the Corellium emulator and a signed, archived Signal-iOS app. This requires a Corellium user account for the virtualized device and Apple Developer account to sign the modified Signal binary. If you are following along and neither are available to you, you can either jailbreak an iPhone (not covered in this blog) or extend the leak primitive to provide other library addresses that would otherwise be chained together.
Corellium offers emulation solutions for iOS and Android by providing a virtual jailbroken devices. Set-up is extremely easy and provides a variety of device and firmware versions to replicate the exact target environment.
Next we must install Signal on the device. Per Corellium’s documentation, we need an unencrypted and signed app. This requires signing and archiving (with a valid Apple Developer account) our Signal-iOS project. We also need to tweak our repo by removing some of the entitlements that we do not have access to, because we are not part of the Signal org! This is fine for the sake of our research since these entitlements do not affect the functionality of our exploit and we are not actually deploying this app in production.
Remove the following entitlements from the Signal, SignalShareExtensions and SignalNSE targets (in the Project Navigator pane, click on the main Signal project -> Signing and Capabilites, and choose each target):
- Apple Pay
- Communication Notifications
- Data Protection
We must also update the SIGNAL_BUNDLEID_PREFIX in the project’s Build Settings tab to reflect our own company/entity, since we are not part of Signal’s org.whispersystems. We are now free to change the Team to our own Apple Developer account in the Signing and Capabilities tab. This change is only required for non-App Store Release configurations, because we are definitely not releasing this modified app to the App Store!
Team from org.whispersystems to the company/user affiliated with our Apple Developer account.Finally, we change Signal’s build configuration scheme for archiving, from App Store Release to Testable Release.
Archive options to Testable Release.Now we can archive (Product -> Archive) with the target as Any iOS Device (arm64) to compile a .ipa file for installation.
Make sure to select theDebuggingdistribution as the final output, since this configuration allows us to attach Xcode to Corellium for testing. Installation on our Corellium device is as simple as dragging and dropping the output .ipa into Corellium’sAppspane.
After installation in Corellium, make sure to change the following app settings on-device otherwise the app will hang after submitting the registration verification code:
- Disable notifications in
Settings -> Signal - Disable background app refresh for Signal in
General -> Background App Refresh
It is extremely useful to hook up our Xcode debugger to the remote app for exploit development and testing. We can do this using Corellium’s USBFlux utility. Simply follow the instructions and Xcode should recognize the remote device as a target run destination! We can then boot Signal on the virtual device and connect our Xcode debugger to it using Debug ->Attach to Process by PID or Name....
We are finally ready to assemble our exploit and achieve RCE on the emulated device.
ROPing in RTC
Before we discuss our specific ROP chain, it is worth understanding ROP in ARM64 more generally. Those familiar with x64 ROP chains know that control is gained and maintained by popping a controlled value into RIP using the ret instruction. So long as we have control of the stack and use gadgets that end with a ret we can pop the next gadget into the instruction pointer. ARM64, and specifically iOS, work a bit differently. ARM has a link register, lr (also named x30) that stores the return address for a given function frame. Like x64 it is pushed onto the stack during the function prologue.
sub sp, sp, #0x50
stp x24, x23, [sp, #0x10]
stp x22, x21, [sp, #0x20]
stp x20, x19, [sp, #0x30]
stp x29, x30, [sp, #0x40]
Unlike x64, the ret instruction (or retab instruction when dealing with iOS PAC instructions, see below) simply moves lr into pc - it does not pop a value off the stack. Instead, lr is loaded (along with the pushed frame pointer, fp, a.k.a. x29) with the ldp instruction in a function epilogue:
ldp x29, x30, [sp, #0x40]
ldp x20, x19, [sp, #0x30]
ldp x22, x21, [sp, #0x20]
ldp x24, x23, [sp, #0x10]
add sp, sp, #0x50
retab
Note that ROP on iOS is dependent upon whether the application supports Pointer Authentication Codes (PAC). The arm64e architecture includes PAC instructions which protect against exploit strategies like ROP. In this case, instructions which push addresses also sign the pointer with a unique key. Instructions that load this data validate the signature, triggering an error if the validation fails. To bypass PAC we would need to forge signed pointers through the use of signing gadgets, which are frequently removed. Thankfully, this is not needed because PAC is only enabled for iOS native apps (Safari, iMessage, etc.) and not third-party apps like Signal. The shared cache is compiled for arm64e, however we can treat the PAC instructions as their non-PAC counterparts with a no-op for signing and validating.
To continue execution control we must search for gadgets prior to a ret/retab instruction and spoof the expected stack frame so that our next gadget address resides at sp + X - 8 (where X is the constant in add sp, sp, #X or ldp x29, x30, [sp] #X; 0x50 in the above example). This unfortunately means our ROP gadgets take up more space in a payload than the average x64 gadget. That said, they may provide control to a couple other registers; the gadget shown above allows us to control the values for x19-x24 in addition to fp and lr as we exit the frame. We leverage this a lot in our constructed chain, specifically controlling x19 and x20 because they are commonly used to set other registers. This is the primary gadget layout we’ll use in our payload.
X - 8 from the current stack pointer (where X is the stack frame size).Gadgets are unfortunately few and far between for manipulating certain registers, specifically x4 and x5. Another way of maintaining control is through blr gadgets, or blraaz (PAC instruction) gadgets in the shared cache. This opens up more possibilities so long as we can control the register responsible for branching.
mov	x5, #0
ldr	x6, [sp]
blraaz	x6
The only consideration with these gadgets is that they do not adjust the stack, so the gadget jumped to must load the next lr from an offset that does not conflict with the blr gadget's ldr/ldp instructions. For the blraaz gadget above (gadget 0) followed by two generic ROP gadgets (gadget 1, 2), we have the following layout in our payload:
blraaz gadget (gadget 0) which jumps to the address pointed to by the current sp. sp is not updated during the branch, meaning the execution of the next gadget (gadget 1) loads the subsequent gadget (gadget 2) from an offset based on its (gadget 1's) stack frame size.We also need a strategy for jumping sp to an address we control. This is useful for pivoting from a stub ROP chain to a longer chain or creating conditional loops in our chain. For this we’ll use a sub sp, x29, #Z gadget. We set x29 as we exit the prior gadget and that value is immediately used to calculate a new sp of our choosing:
sub	sp, x29, #0x10
ldp	x29, x30, [sp, #0x10]
ldp	x20, x19, [sp], #0x20
retab
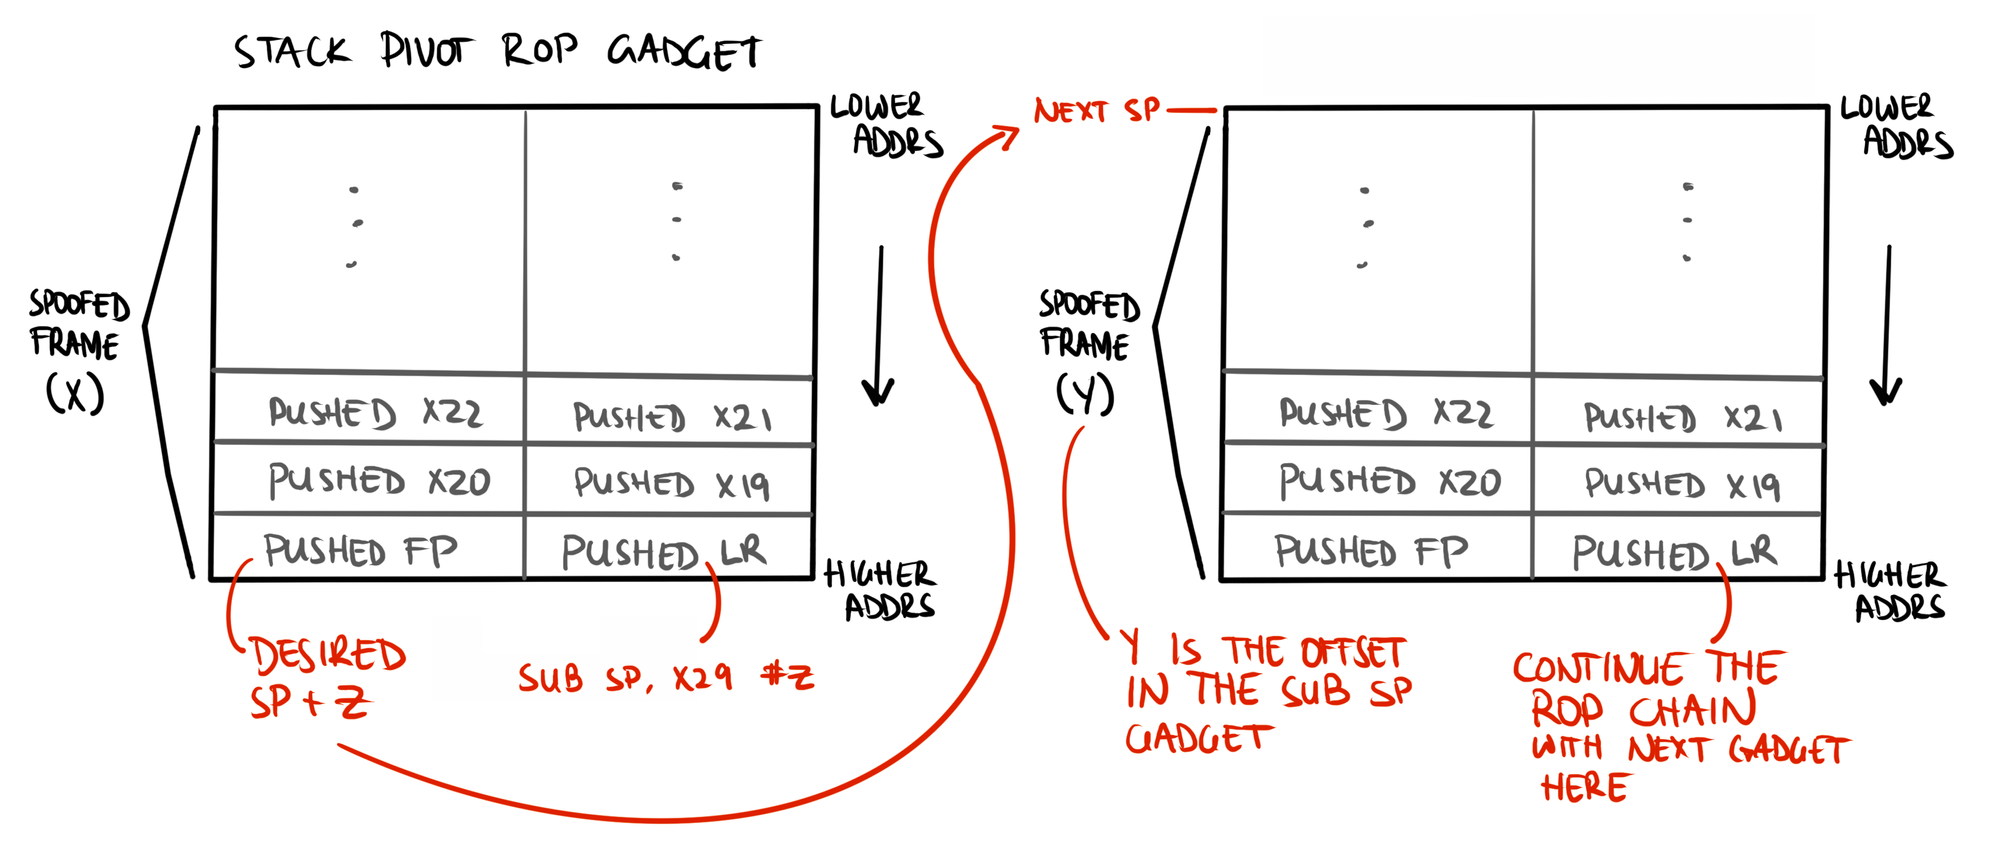
x29 as it exits its frame to a destination of our choice, destired sp + #Z. Entering the sub sp, x29, #Z gadget adjusts sp to our destination address. If the new address contains a ROP gadget frame, control continues.Our final consideration is how to handle function calls, such as SendRtcp or system calls like open. To continue control we cannot simply jump into the function at its entry. If we do so the prologue will store the existing lr—which points to the function entry—on the stack. The epilogue then loads the pushed lr and moves it into pc, resulting in an endless loop within the same function.
Instead, we can jump past the prologue and spoof the stack frame that the prologue would have created. So long as our next gadget’s address resides at the offset expected in the epilogue, we maintain control!
; cricket::MediaChannelUtil::TransportForMediaChannels::SendRtcp(int, int, unsigned __int64)
SUB             SP, SP, #0xE0
STP             X22, X21, [SP,#0xD0+var_20]
STP             X20, X19, [SP,#0xD0+var_10]
STP             X29, X30, [SP,#0xD0+var_s0]
ADD             X29, SP, #0xD0
MOV             X19, X2 ; JUMP HERE!!!! STACK FRAME IS SET ABOVE
MOV             X21, X1
MOV             X20, X0
MOV             X8, #0xAAAAAAAAAAAAAAAA
STP             X8, X8, [SP,#0xD0+var_B0]

; ...

ADD             X0, X22, #8 ; this
BL              __ZN3rtc17CopyOnWriteBufferD1Ev ; rtc::CopyOnWriteBuffer::~CopyOnWriteBuffer()
MOV             W0, #1 ; LOAD VALUES FROM OUR SPOOFED FRAME HERE!
LDP             X29, X30, [SP,#0xD0+var_s0]
LDP             X20, X19, [SP,#0xD0+var_10]
LDP             X22, X21, [SP,#0xD0+var_20]
ADD             SP, SP, #0xE0
RET
Laying out the ROP Chain
Once we hijack pc we need a plan of attack for our ROP chain. Let's quickly summarize where we are at and the techniques at our disposal.
We can hijack the instruction pointer by overwriting the pushed lr in RTCPReceiver::IncomingPacket’s stack frame on the worker thread's stack. We can store any data we want elsewhere on the worker thread's stack for later use (since we know the stack's address range), which is very useful for fetching, manipulating, and storing data. We can easily get the address of our payload on the heap as explained below. We have the address pointing to the database path. We have a sending transport object and the address of its SendRtcp function.
Assuming we can locate our buffer in memory, our first decision is whether to copy our entire ROP chain onto the stack or pivot to our buffer. We could do the former, but let’s practice stack pivoting in ARM and only copy a minimal payload that pivots sp to our data buffer.
Our plan, at a high level, is as follows:
- Pivot the stack to a longer ROP chain in our payload
- Open and read the database into memory
- Create a spoofed stack frame on the worker thread's stack for the call to
SendRtcp. This function calls various sub-functions that clobber data below the stack pointer. We will jumpspto the worker thread's stack for this call and jump it back after, thereby protecting our ROP payload (and loops) from being clobbered - Iterate through the database data, calling
SendRtcpto exfiltrate chunks of data - Loop infinitely once we’re finished. We need this thread to stay alive so Signal can context switch to the network thread and send our queued packets. Restoring system state to pre-hijack conditions is tedious. Instead, if we jump to a
retabinstruction without updatinglr,lrcontinues to point at theretabinstruction. Voilà, infinite loop!
So, how much data can we send back at a time? There is a constraint on the maximum DTLS packet length of 2048 bytes, limiting outgoing packets to slightly less than that after consideration of transport headers. This is also a limitation on our payload since it is sent with RTCP via the DTLS transport. 2048 bytes seems like a lot of data, but spoofing stack frames quickly eats up that space if we are not careful. Let’s plan out a ROP chain that reuses gadget sections as much as possible to save on space, based on our above plan.
NotationsPUSHED_LR,RTCP_CALL, etc. in the images below refer to constant offsets defined in the exploit script.
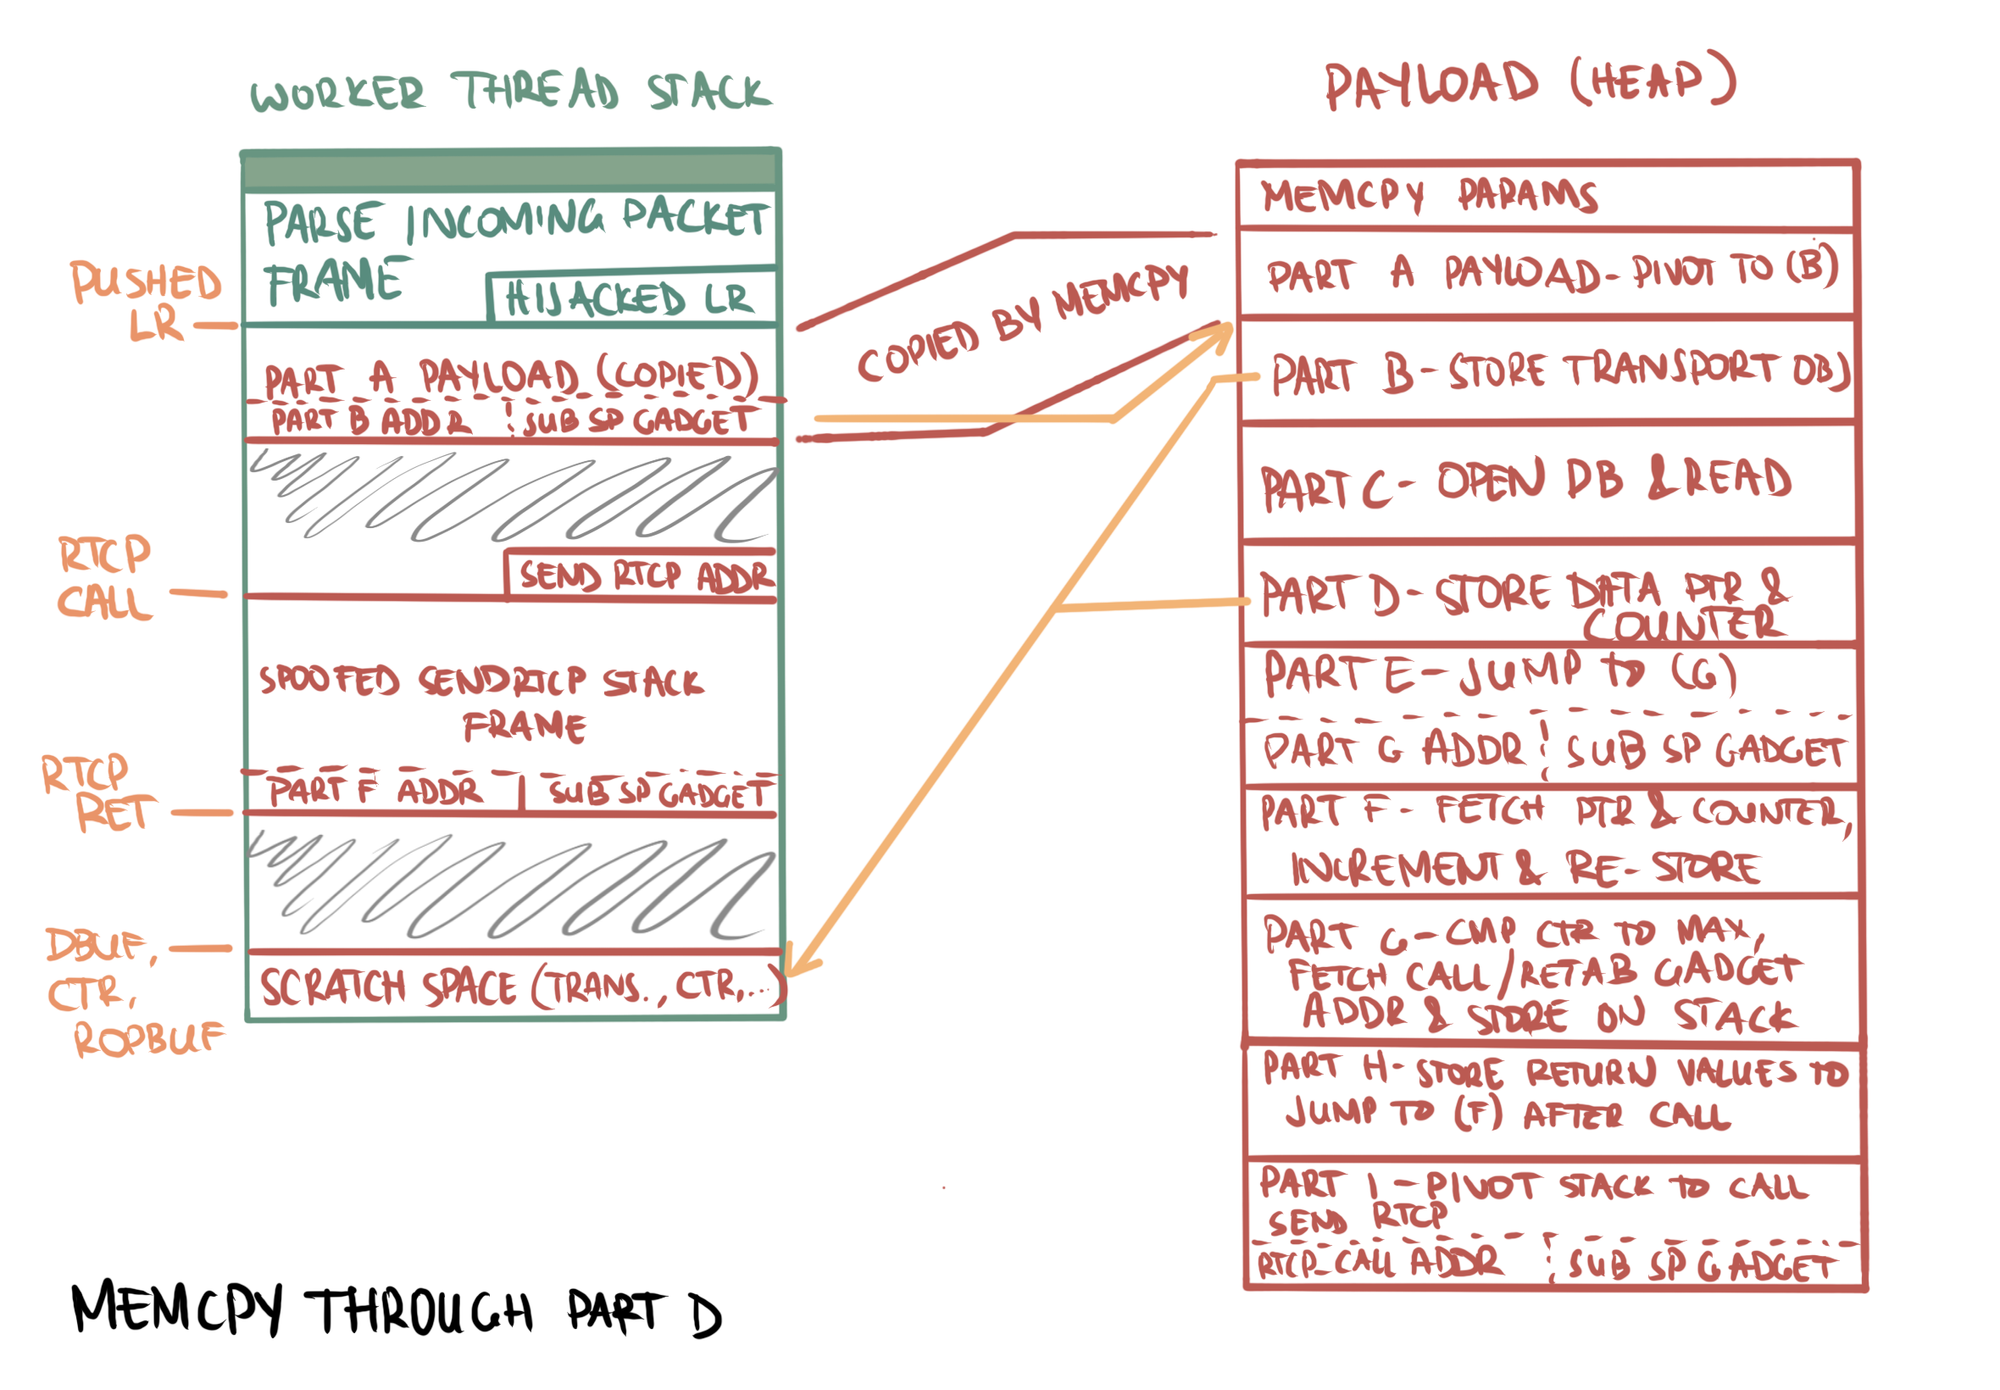
- Part (a): Small ROP payload copied to the stack to pivot
spto (b) - Part (b): Store the address of the transport object to scratch space on the worker thread's stack so it can be easily fetched later before the
SendRtcpcall - Part (c): Open a new file handle to the database and read its contents into memory using
mmapwith the returnedfd - Part (d): Store the database data pointer and a counter (initialized to 0) on the stack for use in the
SendRtcpcall
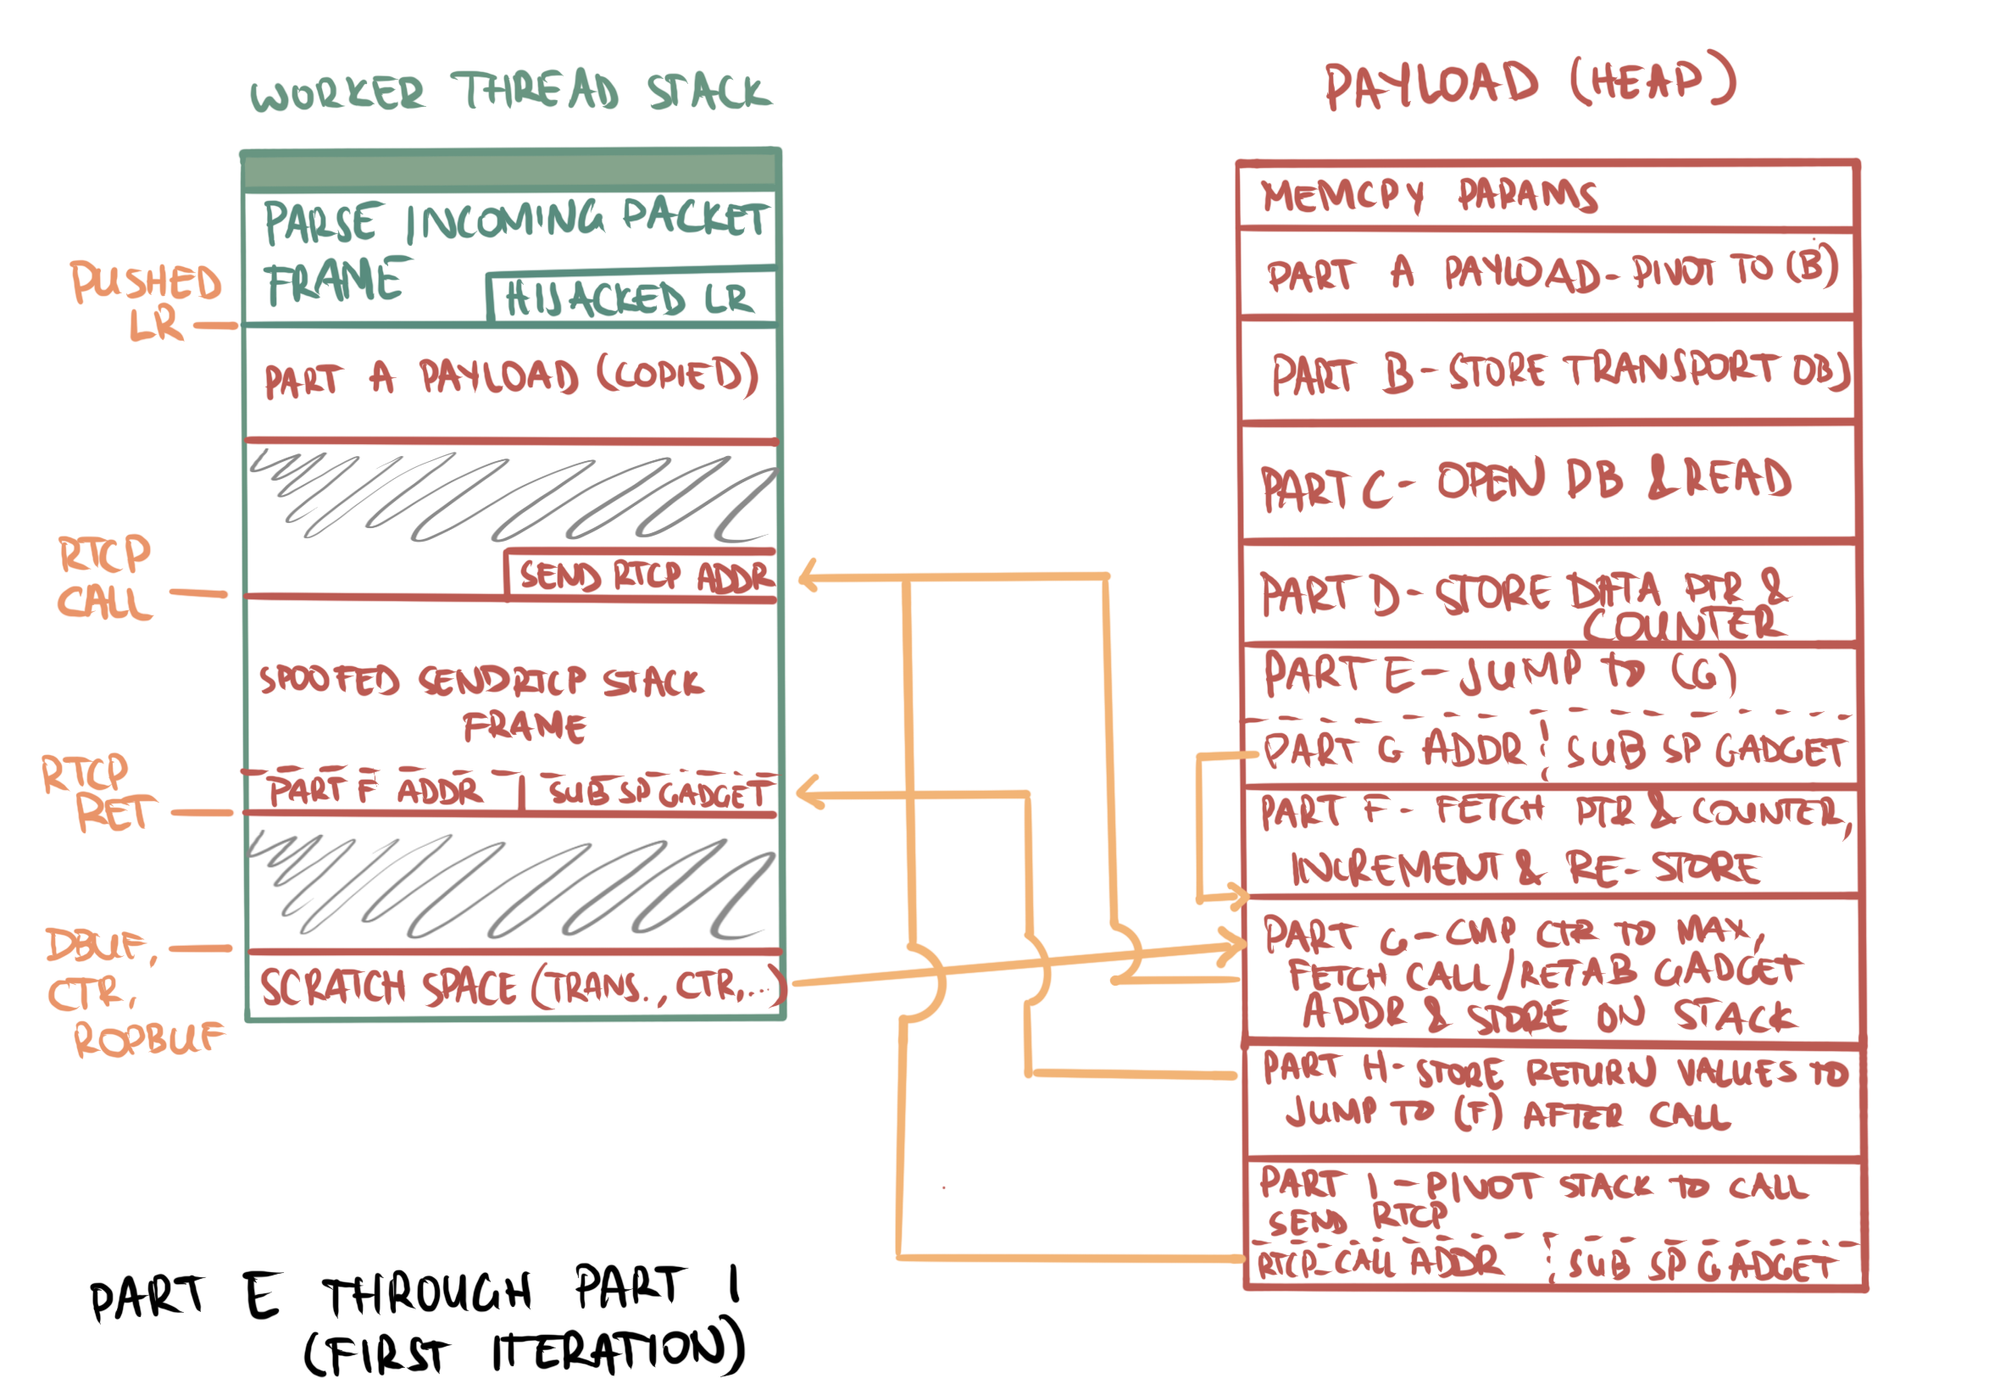
- Part (e): Jump to (g) (skip increment)
- Part (f): Fetch the database data pointer and counter from the stack's scratch space. Increment the counter, advance the buffer by 1984 bytes, and store the updated values back on the stack. Skipped in first iteration
- Part (g): Load the counter and compare against some predefined limit. Store a chosen address on the stack at the bottom of a spoofed function frame depending on the result of a comparison: if the counter is less than the limit, store the address of
SendRtcp; if equal, store address of aretabinstruction - Part (h): Store a return
fpandlrinto the spoofedSendRtcpfunction frame on the stack where the epilogue expects them - Part (i) - pivot the stack by jumping to the bottom of the spoofed
SendRtcpstack frame. This loads a pushedlrthat either callsSendRtcpto queue a packet with exfiltrated data, or an infiniteretabif we reached our limit in (g)'s comparison
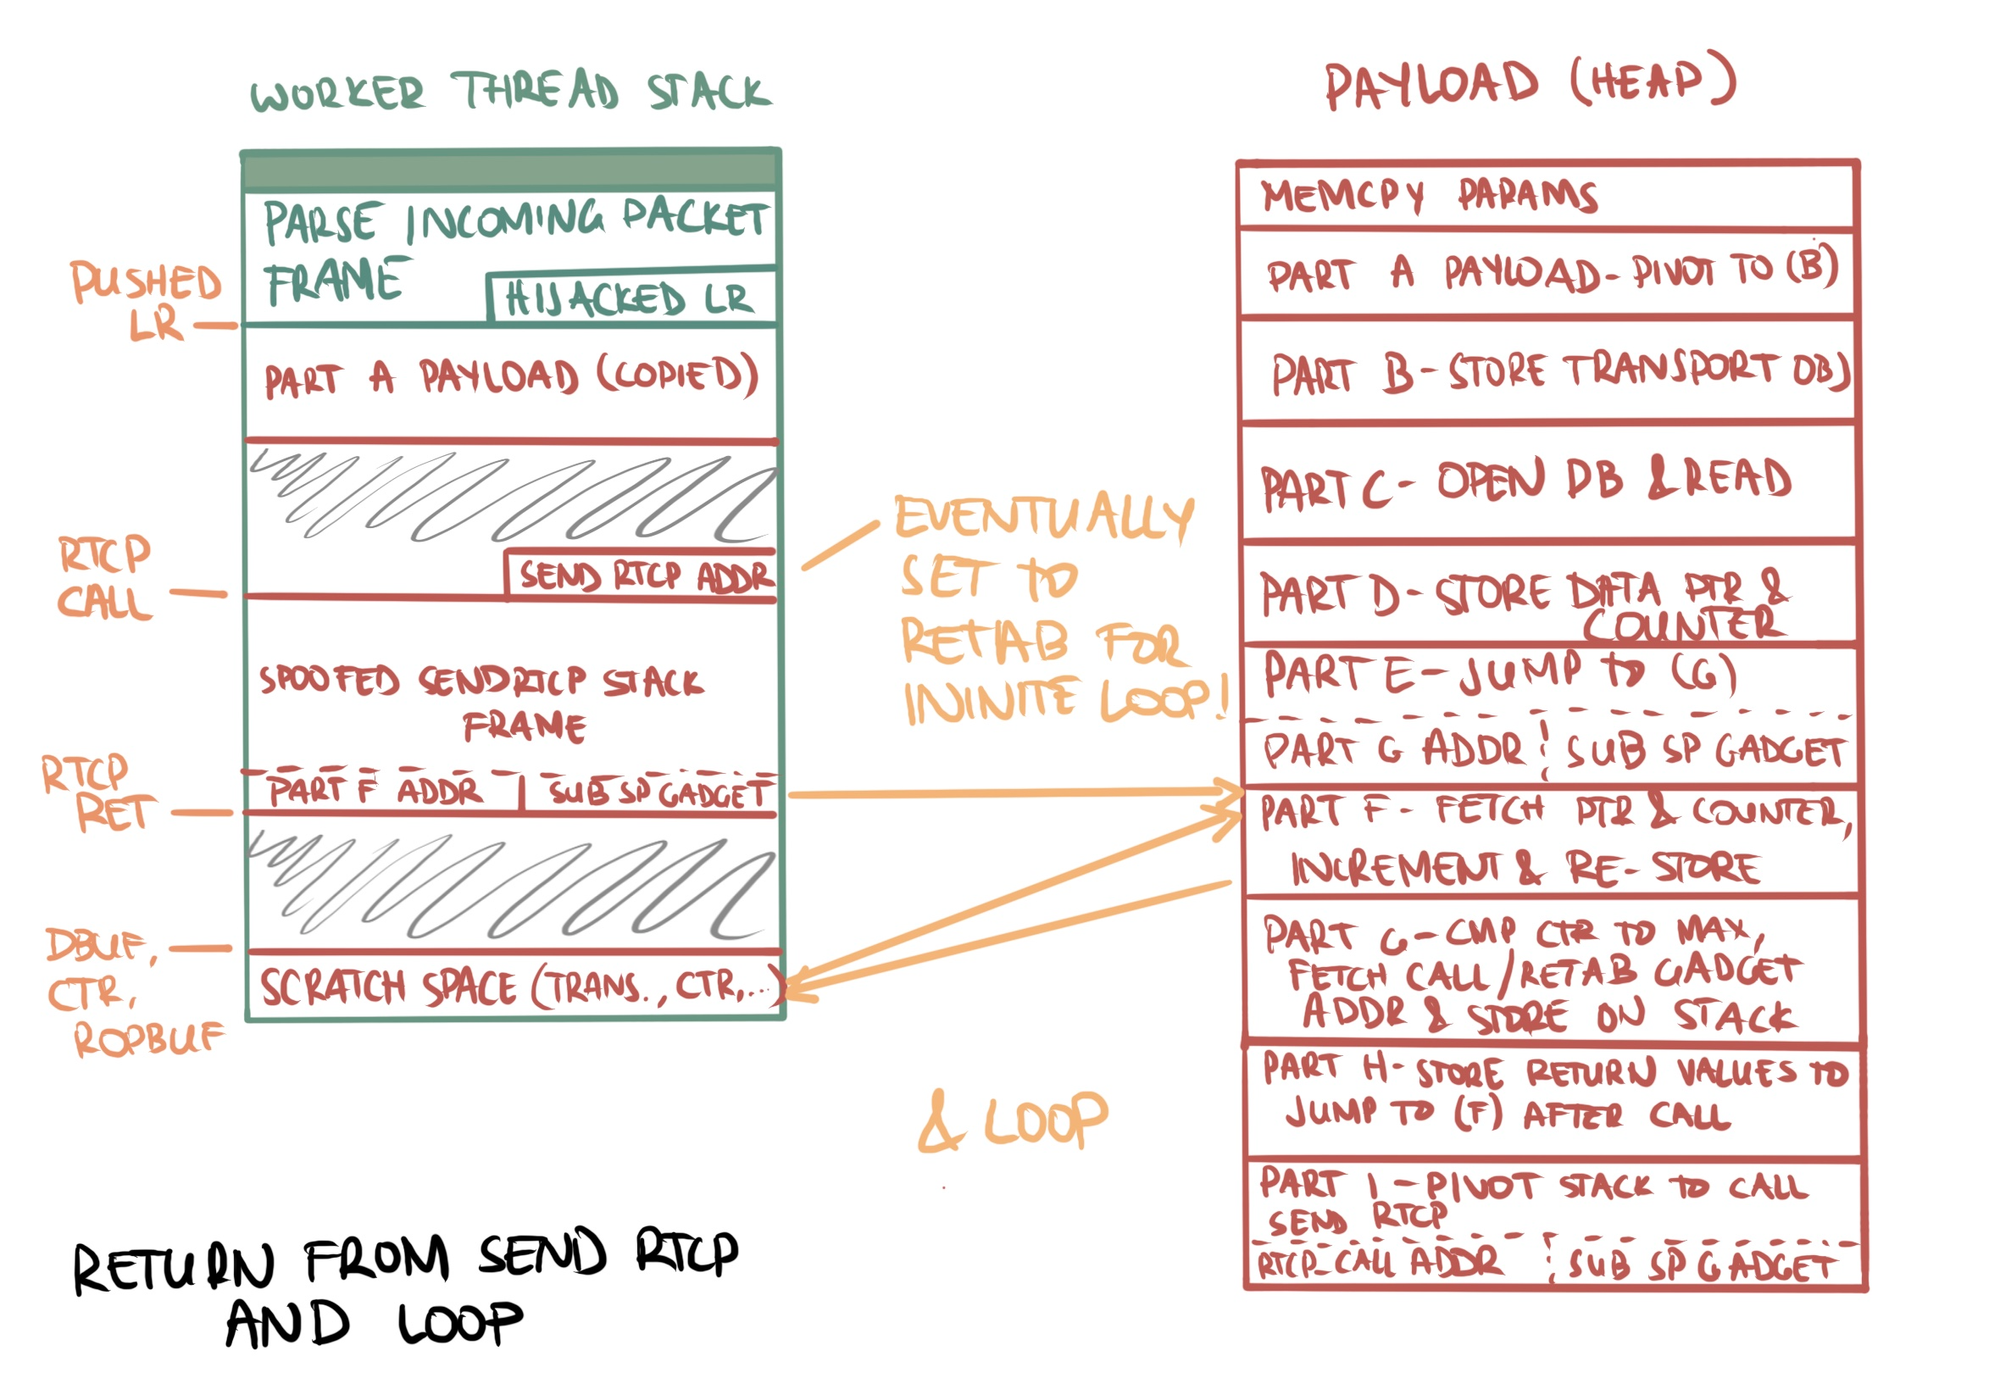
SendRtcp, which pivots the stack back to part (f) to increment our exfiltrated data counter and buffer pointer. This loop continues until the limit is reached, in which case the retab gadget causes an infinite loop.- The
SendRtcpepilogue loadsfpandlrpointing to asub sp, x29gadget. We strategically store an x29 that points to part (f) to increment the data pointer and counter and loop to send the next packet. Eventually we reach our exfiltration limit and aretabgadget is stored on the worker thread's stack, tying up the worker thread in an infinite loop
Our puzzle is finally taking shape! The only remaining piece is finding our buffer address so we can dynamically calculate offsets into our ROP chain. Our exploit targets the pushed return pointer for webrtc::RTCPReceiver::IncomingPacket. Disassembly of its call to ParseCompoundPacket(rtc::ArrayView<uchar const>,webrtc::RTCPReceiver::PacketInformation *) shows that the payload address is in x21 (x0 is this, and the ArrayView is broken into the byte buffer (x1) and the length (x2)):
; webrtc::RTCPReceiver::IncomingPacket(rtc::ArrayView<unsigned char const, -4711l>)

; ... ;

ADD             X3, SP, #0x1F0+__dst
MOV             X0, X19
MOV             X1, X21
MOV             X2, X20
BL              __ZN6webrtc12RTCPReceiver19ParseCompoundPacketEN3rtc9ArrayViewIKhLln4711EEEPNS0_17PacketInformationE ; webrtc::RTCPReceiver::ParseCompoundPacket(rtc::ArrayView<uchar const,-4711l>,webrtc::RTCPReceiver::PacketInformation *)
CBZ             W0, loc_21DF74
We start our ROP chain with mov x0, x21 followed by stp x0, [x19] to store the heap buffer address in our stack scratch space for future reference, and then we continue with the ROP chain outlined above!
We chose all our ROP gadgets from the target iOS's shared cache and stored information about their layout ingadgets.json. Adjustment to a different target iOS version requires finding offsets for gadgets with identical functionality in the new version. The exploit script accepts a customgadgets.jsonfile using its-gcommand line flag to facilitate targeting different versions.
Achieving RCE
With our ROP chain assembled, Signal-iOS app target running in Corellium, and thrower device booted with Frida, we are ready to throw our exploit! Simply input the target phone number and emulator name in the command below:
cd frida_scripts
python3 exploit.py -l call.js,exploit.js -n 15555555555 -D emulator-XXX \
    -c ~/Documents/iPhone15,2_16.4_20E247_Restore.ipsw -s ~/Documents/Signal.ipa \
    -g ./gadgets.json
And we successfully receive the (encrypted) database data on our throwing device!
Video 1: Landing the POC exploit script against the Corellium target. After the exploit finishes, the call is left to timeout on the target to demonstrate that the Signal app is still able to send messages.
Next Steps
We completed our exploit and achieved the goal of leaking Signal-iOS's database using the synthetic WebRTC bugs. Along the way we discovered how to break ASLR for Signal and a variety of shared libraries, learned how to use and debug exploits in Corellium, and constructed a complex ARM64 ROP chain.
In our final post in this series, we discuss the practicality and limitations of this exploit from an offensive perspective. We also investigate the indicators of compromise (IOCs) and detection strategies when viewed from a defensive lens. Stay tuned for more!